Thursday, December 4, 2008

Windows 7 Ultimate Milestone 2 (M2) Build 6589.1


INFO:

Windows 7 Milestone 2 Ultimate Edition is alive, kicking and as real as they get! Although it's but one year away from the moment Windows Vista hit the shelves, and despite being in the final stages of development of Windows Vista Service Pack 1 and Windows XP Service Pack 3, Microsoft is also building Windows 7.At this point in time,Windows 7 is being dogfooded inhouse by Microsoft. However, the successor of Windows Vista was also shipped in an early stage to a select pool of the Redmond company's key partners.

On January 24, you were able to feast your eyes on the first ever leaked screenshots from Windows 7 Ultimate Edition version 6.1
(Build 6519.1.x86fre.winmain.071220-1525), courtesy of ThinkNext.

Because of numerous accusations that the images had been tampered with, and were fake, the Chinese blog posted the video embedded at the bottom of this article. Yes, this is Windows 7

"I was about to share something interesting about Windows 7 in my last post,Windows 7: The Real Thing. The ISO image, bootable, installation, evaluation and the screenshots are all real. I mean there is no Photoshop or anything like that involved,"reads a fragment from ThinkNext."I'm not a person who makes himself complacent by faking something hot, neither will I be unhappy if someone denies the real information I posted. I don't mean to draw much attention, especially from those suckers.

Users that are running Windows Media Center under Vista Home Premium and Ultimate SKUs will undoubtedly notice differences when it comes to the WMC running in the Ultimate edition of Windows 7. While the interface is approximately the same, the text size has changed, and so has the number of categories.

In fact,Windows 7 M2 is nothing more than an artificially customized image of Windows Vista Service Pack 1, masquerading as the next version of Windows. Even more, there has been no official confirmation of Windows 7 Milestone 2 from Microsoft or from other sources. In this context, M2 is as good as inexistent.

Windows 7 M2 comes, as all software under development from Microsoft."I don't think there is anything wrong, disappointing or weird that Windows 7 Milestone 2 isn't greatly different from Vista. It's only Milestone 2 so lots of code may be reused. Besides, even we can't see much visual changes, that doesn't mean Win7 internals don't change greatly. Here from the release notes, I read: 'the software will stop running on June 2008. You may not receive any other notice. You may not be able to access data used with the software when it stops running'," added ThinkNext.


Screens & Features


The Real Windows 7 Ultimate Milestone 2 (M2) Build 6589.1


Bootable On ISO Format


Support About 90 Languages


Activated And Genuine Windows


Working Firewall And Updates


Milestone 2 Ultimate Edition 6589.1.

Try: Post your comment for the download link.

Wednesday, November 26, 2008

Flash Disinfector

Flash Disinfector was designed to remove unwanted files including autorun.inf on removable USB drives, flash drives and memory sticks. Use flash disinfector if you cannot access your USB drives, flash drives and memory stick due to modifications done by autorun Worms.

Author: sUBs

Operating System: Windows 2000/XP/Vista

Download Here:
Flash Disinfector

Threat Removal Procedure:
1. Download Flash_Disinfector and save it ot your Desktop.2
2. After downloading, double-click on Flash_Disinfector to run it.
3. Just follow the prompts and continue until it begin scanning.
4. If asked to insert your flash drive or any removable device including USB Pen Drive and Memory Stick, please do so.
5. It will scan removable drives, wait for the scan to finish. Done.


Wednesday, October 22, 2008

Microsoft Windows SHORTCUT Keys

Internet Explorer Shortcuts:


CTRL+A - Select all items on the current page
CTRL+D - Add the current page to your Favorites
CTRL+E - Open the Search bar
CTRL+F - Find on this page
CTRL+H - Open the History bar
CTRL+I - Open the Favorites bar
CTRL+N - Open a new window
CTRL+O - Go to a new location
CTRL+P - Print the current page or active frame
CTRL+S - Save the current page
CTRL+W - Close current browser window
CTRL+ENTER - Adds the http://www. (url) .com
SHIFT+CLICK - Open link in new window
BACKSPACE - Go to the previous page
ALT+HOME - Go to your Home page
HOME - Move to the beginning of a document
TAB - Move forward through items on a page
END - Move to the end of a document
ESC - Stop downloading a page
F11 - Toggle full-screen view
F5 - Refresh the current page
F4 - Display list of typed addresses
F6 - Change Address bar and page focus
ALT+RIGHT ARROW - Go to the next page
SHIFT+CTRL+TAB - Move back between frames
SHIFT+F10 - Display a shortcut menu for a link
SHIFT+TAB - Move back through the items on a page
CTRL+TAB - Move forward between frames
CTRL+C - Copy selected items to the clipboard
CTRL+V - Insert contents of the clipboard
ENTER - Activate a selected link
HOME - Move to the beginning of a document
END - Move to the end of a document
F1 - Display Internet Explorer Help


Windows Explorer Shortcuts:


ALT+SPACEBAR - Display the current window’s system menu
SHIFT+F10 - Display the item's context menu
CTRL+ESC - Display the Start menu
ALT+TAB - Switch to the window you last used
ALT+F4 - Close the current window or quit
CTRL+A - Select all items
CTRL+X - Cut selected item(s)
CTRL+C - Copy selected item(s)
CTRL+V - Paste item(s)
CTRL+Z - Undo last action
CTRL+(+) - Automatically resize the columns in the right hand pane
TAB - Move forward through options
ALT+RIGHT ARROW - Move forward to a previous view
ALT+LEFT ARROW - Move backward to a previous view
SHIFT+DELETE - Delete an item immediately
BACKSPACE - View the folder one level up
ALT+ENTER - View an item’s properties
F10 - Activate the menu bar in programs
F6 - Switch between left and right panes
F5 - Refresh window contents
F3 - Display Find application
F2 - Rename selected item


Windows XP Shortcut:


ALT+- (ALT+hyphen) Displays the Multiple Document Interface (MDI) child window's System menu
ALT+ENTER View properties for the selected item
ALT+ESC Cycle through items in the order they were opened
ALT+F4 Close the active item, or quit the active program
ALT+SPACEBAR Display the System menu for the active window
ALT+TAB Switch between open items
ALT+Underlined letter Display the corresponding menu
BACKSPACE View the folder one level up in My Computer or Windows Explorer
CTRL+A Select all
CTRL+B Bold
CTRL+C Copy
CTRL+I Italics
CTRL+O Open an item
CTRL+U Underline
CTRL+V Paste
CTRL+X Cut
CTRL+Z Undo
CTRL+F4 Close the active document
CTRL while dragging Copy selected item
CTRL+SHIFT while dragging Create shortcut to selected iteM
CTRL+RIGHT ARROW Move the insertion point to the beginning of the next word
CTRL+LEFT ARROW Move the insertion point to the beginning of the previous word
CTRL+DOWN ARROW Move the insertion point to the beginning of the next paragraph
CTRL+UP ARROW Move the insertion point to the beginning of the previous paragraph
SHIFT+DELETE Delete selected item permanently without placing the item in the Recycle Bin
ESC Cancel the current task
F1 Displays Help
F2 Rename selected item
F3 Search for a file or folder
F4 Display the Address bar list in My Computer or Windows Explorer
F5 Refresh the active window
F6 Cycle through screen elements in a window or on the desktop
F10 Activate the menu bar in the active program
SHIFT+F10 Display the shortcut menu for the selected item
CTRL+ESC Display the Start menu
SHIFT+CTRL+ESC Launches Task Manager
SHIFT when you insert a CD Prevent the CD from automatically playing
WIN Display or hide the Start menu
WIN+BREAK Display the System Properties dialog box
WIN+D Minimizes all Windows and shows the Desktop
WIN+E Open Windows Explorer
WIN+F Search for a file or folder
WIN+F+CTRL Search for computers
WIN+L Locks the desktop
WIN+M Minimize or restore all windows
WIN+R Open the Run dialog box
WIN+TAB Switch between open items

src:markiee.com

Remove COOL USEP SCANDAL malware

The work of this malware are

  • it changes the default homepage on IE to this site
  • disables homepage of IE
  • infects your windows registry
  • disables regedit.exe, even in safemode
  • copies a file called cool usep scandal

this thingy malware is related to the funny UST Scandal.

It seems that none of the currently available antivirus, or antispyware seems to work.

Detailed instructions on how to remove this malware is from this website.

You also need to download first this files for the removal of the said malware

Best Tool: Cool Usep Remover

Alternate Download:

How to Prevent Virus or Malware

1. Make sure you have an Antivirus, Firewall and Antispyware scanner installed.

Search www.google.com for Anti-virus Information.

Make sure you DON'T download and install any scanner present on this list. These scanners are blacklisted because of their questionable reputation.

Never install more than one Antivirus and Firewall! Rather than giving you extra protection, it will decrease the reliability of it seriously! The reason for this is that if both products have their automatic (Real-Time) protection switched on, your system may lock up due to both software products attempting to access the same file at the same time. Also because more than one Antivirus and Firewall installed are not compatible with eachother, it can cause system performance problems and a serious system slowdown.

I also suggest to perform an online virusscan once in a while. Because what one virusscanner can't find another one maybe can. You'll find some good Online scanners Here.

2. Make sure your Windows is ALWAYS up to date!

An unpatched Windows is vulnerable and even with the "best" Antivirus and Firewall installed, malware will find its way through.
So visit http://windowsupdate.microsoft.com/ to download and install the latest updates.

Effective July 11/October 11, 2006, Windows 98, Windows 98 Second Edition, Windows Me, Windows XP SP1 and SP1a will transition to a non-supported status. Read here for more info:
http://www.microsoft.com/windows/support/endofsupport.mspx
http://support.microsoft.com/gp/lifean19
So make sure you update!

Also read the Top 10 reasons to install Windows XP Service Pack 2 (SP2).

Also, not only your Windows should be up to date, but also the programs you are using. This since many programs may contain Security leaks. To find out if your programs are up to date, run the Secunia Software Inspector.

3. Stay away from illegal/questionable sites.

This is one of the main causes why a computer gets infected. Visiting cracksites/warezsites - and other questionable/illegal sites is ALWAYS a risk. Even a single click on the site can be responsible for installing a huge amount of malware. Don't think: "I have a good Antivirus and Firewall installed, they will protect me" - because that's not true... and even before you know it, your Antivirus and Firewall may already be disabled because malware already found its way on your system.

4. Be careful with mail attachements!

Malware spreads via email as well, especially email attachements.
The most common ones are emails telling you that your computer is infected where you'll find the removal tool in the attachement, emails telling you that your password has changed which you'll find in the attachement, mails with productcodes in the attachement from software you purchased (while you didn't), attachements with so called Security updates etc etc...
Don't trust these mails, don't even open them but remove them immediately instead!

It may also happen you receive a mail from someone you know, but with a questionable attachement present and strange contents in the mail. In this case, this person - or someone else who has your address in his/her addressbook - is infected with malware (worm/spambot) and sends these mails without being aware of it.

Don't click links in emails from someone you don't know, because these links can redirect you to sites where malware gets downloaded and installed.

Mailwasher is a free and great Anti-spam tool which gives you the option to view your mails on the server, sort them and delete the spam mails and other suspicious mails directly from the server without them downloading to your mailbox.
For people who get dozens of spams daily, read this great article where it explains spam and how to deal with it: I hate Spam

5. When surfing...

  • Don't click on links inside popups.
  • Don't click on links in spam messages claiming to offer anti-spyware software; because most of these so called removers ARE spyware.
  • Download free software only from sites you know and trust. Because a lot of free software can bundle other software, including spyware.
  • Be careful when watching online videos, especially when they ask you to install a certain codec to watch the video. By default, your mediaplayer should already have the necessary codecs installed to watch online videos. In case you're prompted to install an additional codec while trying to watch a movie online, it may be a false alert and this so called codec may install malware. More info here and here.
  • Don't install plugins (ActiveX) if you're not certain what it is or why you need it.

A great program is SpywareBlaster. SpywareBlaster doesn`t scan and clean for malware, but prevents it from being installed in the first place. It blocks the popular spyware ActiveX controls, and also prevents the installation of any of them via a webpage.
How to use SpywareBlaster

The MVP Hosts File is a great addition to block bad sites. This is accomplished by blocking these sites through the hosts file.

Install Internet Explorer 7 or another alternative browser like Firefox or Opera for more secure surfing. (However, keep in mind, as long as you don't stay away from illegal/questionable sites, no browser will be secure enough)

Glubble is a great Firefox add-on if you're having kids and want to manage the sites your kids are allowed to see + extra additions.

6. Watch what you download!

If you want to install certain software, always go to the developer's site to download the software from. Then you can be sure you're downloading and installing the right software.
Beware of the fact that certain software (especially freeware) may contain/bundled with extra software including spyware/adware. So only install it when you're sure they are OK.
Read here for more tips about safe downloading.

To find out if what you download is ok and get more information about the intentions of software and other bundled components such as spyware/adware which may be present, use EULAlyzer. EULAlyzer scans the End user license agreements (EULAs) most software should show during install and provides a detailed listing of potentially interesting words and phrases, discovers if the software you're about to install displays pop-up ads, transmits personally identifiable information, uses unique identifiers to track you, or much much more.

The use of P2P Programs like Kazaa (which is bundled with adware/spyware btw), Limewire, Torrentsites, Emule, Bearshare... is always a risk, because you can never be sure what you exactly download. It isn't always what it looks like. Important to know is that many P2P Programs are also bundled with unwanted software (spyware/adware). To find out which ones are safe to use and which ones are infected, take a look here.
Also read this article about the risks of using P2P Programs.

Source: users.telenet.be

Monday, October 13, 2008

Combine different distributions of Microsoft Windows XP/2000/NT on a Bootable CD?

  • This is what you need:
    1. \i386 folders from the original Microsoft Windows XP/2000/NT CDs.
    2. Setup files (from each Windows version):
      It is possible to get the files from the distribution,
      but the easiest way is to copy them from the bootdisks of Microsoft Windows XP/2000/NT (all files of the bootdisks are required setup files).
      Attention: Each distribution has it's own set of bootdisks according to the integrated updates, i.e. if your distribution is WinXP SP1 you'll also need the WinXP SP1 bootdisks (not the ones of WinXP).
      Where to get the disks:
      • Bootdisks for Microsoft Windows XP are available on the Microsoft site
      • Bootdisks for Microsoft Windows 2000 can be found on the original Windows 2000 CD-ROM in the subfolder \BOOTDISK
      • Bootdisks for Microsoft Windows NT can be created by executing the command \I386\WINNT.EXE /OX from the NT CD-ROM.
    3. Additionally needed setup identificaton files (for each seperate distribution):
      Windows version
      Necessary files
      2003 Enterprise WIN51 and WIN51IA
      2003 Standard WIN51 and WIN51IS
      2003 Web WIN51 and WIN51IB
      XP Home WIN51 and WIN51IC
      XP Professional WIN51 and WIN51IP
      2000 Professional CDROM_NT.5 and CDROM_IP.5
      2000 Server CDROM_NT.5 and CDROM_IS.5
      2000 Advanced Server CDROM_NT.5 and CDROM_IA.5
      2000 Datacenter Server CDROM_NT.5 and CDROM_ID.5
      NT Workstation CDROM_W.40
      NT Server CDROM_S.40
      NT Terminal Server CDROM_TS.40
    4. If your distribution already contains ServicePacks, or you are using slipstreamed CDs with Service Packs, you'll also need the following setup indentification files (according to the respective ServicePack):
      Service Pack
      Necessary files
      XP Home Service Pack 1 WIN51IC.SP1
      XP Professional Service Pack 1 WIN51IP.SP1
      2000 Service Pack 1 CDROM_SP.TST
      2000 Service Pack 2 CDROMSP2.TST
      2000 Service Pack 3 CDROMSP3.TST
      2000 Service Pack 4 CDROMSP4.TST
    5. The BootManager Bootable CD Wizard

  • How to create the CD?

    1. Create a folder which will contain all the files for your Bootable CD, e.g.:

      C:\MyBootCD

    2. In this folder, create subfolders for each distribution (e.g. NT_1, NT_2, NT_3) you plan to integrate, e.g.:

      C:\MyBootCD\NT_1
      C:\MyBootCD\NT_2
      C:\MyBootCD\NT_3
      etc.
    3. Copy the \i386 folders of your distributions the the corresponding folders created above. Attention: Copy the folders, not only their contents. Your folder on should now look similar to this:

      C:\MyBootCD\NT_1\I386
      C:\MyBootCD\NT_2\I386
      C:\MyBootCD\NT_3\I386
      etc.

    4. Copy the necessary setup files (see above) to the corresponding folders, i.e. the folders also containing \i386:

      C:\MyBootCD\NT_1
      C:\MyBootCD\NT_2
      C:\MyBootCD\NT_3
      etc.

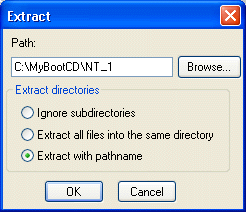
      Attention: If you are using WinImage to extract the setup files from disk images, make sure you use the option "Extract with pathname", as there is at least one subfolder on the bootdisks (system32).


    5. In the folders NT_?, use a HexEditor (e.g., WinHex) to edit the files SETUPLDR.BIN Replace all occurrences of

      'I386' ...

      ...with 'NT_1' in the file C:\MyBootCD\NT_1\SETUPLDR.BIN
      ...with 'NT_2' in the file C:\MyBootCD\NT_2\SETUPLDR.BIN
      ...with 'NT_3' in the file C:\MyBootCD\NT_3\SETUPLDR.BIN
      etc.

    6. In the folders NT_?, use a text editor (e.g., Windows Notepad) to edit the files TXTSETUP.SIF. Replace:

      SetupSourcePath = "\" ...

      ...with SetupSourcePath = "\NT_1\" in the file C:\MyBootCD\NT_1\TXTSETUP.SIF
      ...with SetupSourcePath = "\NT_2\" in the file C:\MyBootCD\NT_2\TXTSETUP.SIF
      ...with SetupSourcePath = "\NT_3\" in the file C:\MyBootCD\NT_3\TXTSETUP.SIF
      etc.

      Attention: On the WinXP bootdisk, the file TXTSETUP.SIF is packed. You will have to delete TXTSETUP.SI_ (imperial) and copy the TEXTSETUP.SIF from your \i386 folder.

    7. In case you have a file BOOTFONT.BIN in the NT_? folders, rename it to FNT.BIN. Use a HexEditor (e.g., WinHex) to edit the files SETUPLDR.BIN. Replace:

      'BOOTFONT.BIN' ...

      ...with 'NT_1\FNT.BIN' in the file C:\MyBootCD\NT_1\SETUPLDR.BIN
      ...with 'NT_2\FNT.BIN' in the file C:\MyBootCD\NT_2\SETUPLDR.BIN
      ...with 'NT_3\FNT.BIN' in the file C:\MyBootCD\NT_3\SETUPLDR.BIN
      etc.

    8. Now add the complete set of setup identification files (see above)to C:\MyBootCD and to the corresponding NT_? folders.

      Attention: The setup identification files must be in both folders, C:\MyBootCD (which will be root of the bootable CD) and the NT_? folders (set of setup identification files corresponding to the distribution).

    9. Unpack the archive Bootable CD Wizard to C:\MyBootCD
    10. Edit the file C:\MyBootCD\BootCat.Ini (configuration file of Bootable CD Wizard) and add the locations and descriptions of your distributions:

      \NT_1\SETUPLDR.BIN ; Install Microsoft Windows #1
      \NT_2\SETUPLDR.BIN ; Install Microsoft Windows #2
      \NT_3\SETUPLDR.BIN ; Install Microsoft Windows #3
      etc.

    11. In your CD writing program, open a new bootable CD project with the following settings:
      Boot image: C:\MyBootCD\bcdwboot.bin
      BootMode: No emulation (without emulation)
      Boot segment (adress): 07c0
      Number of sectors to load: 4
      (detailed howtos: Nero, CDRWin, Easy CD Creator, Instant CD+DVD, WinOnCD, CDImage and mkisofs)
    12. Add the contents of C:\MyBootCD\ to the project
    13. Add your files
    14. Burn the disk.

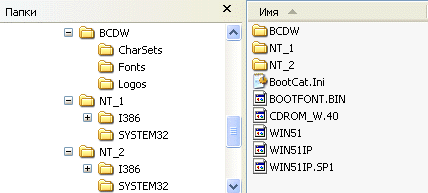
  • Directory listing of a CD with BootableCDWizard containing russian versions of Microsoft Windows NT Workstation and Microsoft Windows XP Professional SP1:

Copyright (c)2004 by reanimatolog. http://bootcd.narod.ru
English translation by Wolfgang Brinkmann

Wednesday, September 10, 2008

Browser Battle: Firefox 3.1 vs. Chrome vs. IE 8


The browser wars are heating up by the week. Here is a breakdown of the browser battle lines for Chrome, Internet Explorer, and Firefox.

JR Raphael, PC World blogger

Mozilla's second alpha of Firefox 3.1 is upping the ante in the next-generation browser battle. So how do the main contenders stack up so far now? One thing's for sure, the Firefox team has taken note of Google's recent Chrome release and worked hard to make sure its offering can hold its own.

Mozilla had already claimed its 3.1 version could outperform Chrome when it comes to speed (and most independent tests show it at least tying). Now, the engineers have incorporated Chrome-initiated options such as the ability to drag and drop tabs in and out of browser windows. The second alpha release also adds support for the HTML 5 video tag, which gives Web developers expanded options for embedding video within a page. Don't forget, too, that Microsoft's new Internet Explorer 8 beta 2 -- released at the end of August and quickly eclipsed by Chrome's introduction -- is also vying for a piece of the pie.

Here's a breakdown of the high and lowlights of each offering and where it stands as far as a full release.

Contender #1: Google Chrome

The status: Windows beta released September 2. Mac OS X and Linux versions still under development and said to be coming soon. No indication of targeted full release date.

The good:

  • Reliability. Chrome's multiprocess architecture makes a bad Web page less likely to take down the whole browser.
  • Speed. Chrome loads fast and keeps your surfing super-fast.
  • Simplicity. Its clean design wastes no screen space.
  • Searching. The Omnibox lets you type search terms or URLs into a single spot and figures out what you want.
  • Privacy. Chrome offers an "Incognito" mode that lets you easily leave no footprints from where you've been.

The bad:

  • Privacy. Chrome's taken a lot of heat for its monitoring and collection of user data, some of which happens before you even hit enter.
  • Security. It didn't take long for users to discover vulnerabilities in the beta browser. Several of these have already been patched.
  • Reliability. Some sites and online services still don't work with Chrome.
  • Consistency. Because Chrome is build on the WebKit system, it differs from the dominant platforms that most designers focus on.
  • Support. Chrome doesn't yet have any add-ons or customization options available. It's yet to be seen how these, once developed, will compare to the rich options available for Firefox.

Contender #2: Firefox 3.1

The status: Second alpha build released September 5. Beta expected in the next month. Full release targeted for end of 2008.

The good:

  • Strong foundation. Mozilla's already built a loyal following with Firefox, and it doesn't intend on letting that go. With Firefox 3.1, you know you'll have a powerful library of add-ons and support already at your fingertips, not to mention the slew of other assets unveiled in Firefox 3.0.
  • Speed. Mozilla says its still-under-development TraceMonkey JavaScript platform will leave Google's V8 in the dust. The second alpha build revs things up, too, with added support for "Web workers" -- a system that lets multiple scripts run as background processes.
  • Competitive edge. Mozilla's developers have good reason to watch what Chrome is doing -- and work to match it, if not one-up it.

The bad:

  • Security questions. Some studies -- albeit, Microsoft-funded ones -- have suggested Firefox, with its frequent new versions, is more susceptible to threats than the other options.
  • Crash potential. Unlike Chrome, Firefox does not have separate environments for each tab -- so one rogue page can still take the whole program down.
  • Support. Firefox has worked hard to snag a small portion of the browser market share, and most early predictions show Chrome taking away more of its userbase than IE's.
  • Google's focus on Chrome will also take away some of its previous focus on Mozilla's development efforts. Will Firefox be able to remain a key player in the browser war?

Contender #3: Internet Explorer 8

The status:: Second beta released August 27. Full release expected before the end of 2008.

The good:

  • Support. Love it or hate it, Internet Explorer is hanging on to about three-quarters of the browsing market with its default status in all Windows machines. You know developers and designers are going to cater to it.
  • Security. With Microsoft at its helm, IE hangs on to a reputation of safe and reliable browsing.
  • Privacy. IE 8 was the first to offer a no-record browsing mode, branded here as InPrivate Browsing.
  • Searching. IE 8's Smart Address Bar offers similar functionality to Chrome's Omnibox, letting you type in URLs or search terms and taking you to the right place.
  • Added add-ons. IE 8 finally catches up to Firefox with a new "Gallery" full of third-party add-on options..

    The bad:

  • Speed. Independent tests have found IE 8 to be significantly slower than the alternative choices. Resources. IE 8 uses a lot of memory compared to its competitors -- a factor that could considerably slow down the rest of your system.
  • Crash potential. While IE 8 does use separate processes for tabs, similar to Chrome's approach, it does not do so to the same degree
  • -- still leaving room for a total meltdown.
  • Competition questions. Can IE's add-ons reach the level of Firefox's? Already, some users are complaining of problems even getting them to work.

That's the lowdown on the battle's current status. Remember, all three of these programs are still early in their development, so many of the pluses and minuses could change as things move forward. One thing's for sure, though: This battle is on, it's growing fierce, and each of its contenders will do anything it can to win.

Friday, August 1, 2008

TweakVI Ultimate 1.0-1085

The first software designed to both tweak and optimize Windows Vista.
Tweak hundreds of hidden features of Windows Vista, optimize your machine and customize it to your needs.

TweakVI is available in three different editions: the 'Basic Edition', which contains all the basic tweaking features for standard system tweaking, the 'Premium Edition', which gives you access to much more tweaking and system optimization features, and the 'Ultimate Edition', for complete control on Windows Vista, with all plugins available for TweakVI.

The best tweaking software ever!
The original TweakVI offers what you need to customize and optimize Windows Vista:

Unlike other tweaking utilities, TweakVI bundles lots of different utilities in one. It was developed to combine both tuning and optimizing features to increase the speed of your Windows Vista system. It's the worlds first software for Windows Vista to combine both customization, tweaking and optimization features.

Some features of TweakVI:

- Activate hundreds of hidden Windows Vista settings
- clean your registry
- activate system and software restrictions
- display detailed system information
- create a 256 MB RAM drive
- protect your privacy
- clean your hard drive
- manage TrueType fonts
- improve your internet connection
- optimize your CPU
- optimize your RAM
- manage system updates, and much more ...
- you can even transfer your tweaks and settings to other machines!

Try

SpeedConnect Internet Accelerator

Top internet accelerator (according to PC Magazine), a network settings optimizer to speed up your existing Dial-Up Modem, DSL, Cable, Wireless, LAN, High-speed internet connections.

SpeedConnect Internet Accelerator is a powerful Windows application designed to optimize your network connection and speed up all your internet activities. This translates into a faster internet connection, faster browsing and email, faster downloads, faster online gaming, improved Skype connection.

Features:
* FASTER internet connection
* Browse FASTER
* Send and receive e-mail FASTER
* Download and upload files FASTER
* Play online games FASTER
* Improve Skype connection
* NO adware, NO hardware installation
* NO service subscription, NO monthly fees
* NO new hardware installation
FEATURES
* Optimizes all internet connection types
* User friendly
* Quick Optimizer option
* Advanced Customization
* Tool and Wizards
* Load/Save Settings
* Optimization Report
* Connection Analyze
r

Trial: Try Me

Friday, July 25, 2008

Intel New System On A Chip Designs

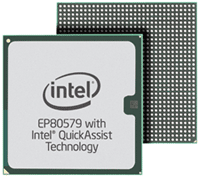
Gadi Singer, Vice President of Intel’s Mobility Group, and Doug Davis, Vice President of Intel’s Digital Enterprise Group, held a conference call today to discuss a brand new product line from Intel targeted at security, storage, communications, and industrial applications, the Intel EP80579 Integrated Processor family.

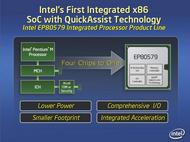
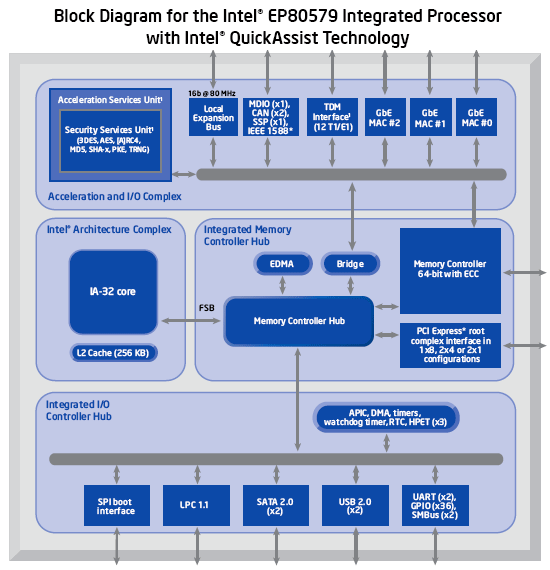
Although the Intel EP80579 branding will be new to most of you, the underlying technology is comprised of products that have a well established history at Intel. In fact, this line of products is based on the Pentium M processor core, as it has been in development for quite some time now. The Intel EP80579 Integrated Processor family, however, is more than just a new processor. The products actually consist of new System on a Chip designs that integrate a Pentium M core, with a Memory Controller Hub (MCH), I/O hub (ICH), and in some cases specialized security, TDM (Time Division Multiplexing for voice-over-IP apps), and data path acceleration engines, which have been dubbed Intel QuickAssist Technology.

Development was started on the Intel EP80579 Integrated Processor family to prepare the company for the impending onslaught of smart, Internet-connected devices and appliances predicted to arrive over the next few years. The Intel EP80579 product line puts Intel in a position to target several growth areas across Consumer Electronics (CE), Mobile Internet Devices (MIDs) and other embedded markets. "We’re now able to deliver more highly integrated products ranging from industrial robotics and in-car infotainment systems to set-top boxes, MIDs and other devices. By designing more complex systems onto smaller chips, Intel will scale the performance, functionality and software compatibility of IA while controlling the overall power, cost and size requirements to better meet respective market needs,” said Gadi Singer.


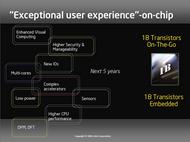
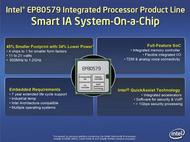
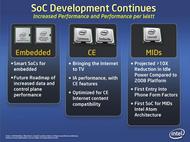
In addition to lower-power characteristics and the smaller form factors enabled by the Intel EP80579's integrated design (in some cases, Intel claims they will lead to platforms that have a 45% smaller board footprint and 34% lower power dissipation), the main benefit of this product line is its native support of Intel Architecture (IA), aka x86. As we stated in our initial coverage of Intel's Atom processor, manufactures of today's smart phones, set top boxes, and MIDs, and software developers, must contend with incompatibilities between the many different platforms being used today. Should these devices all use IA, however, developing software for them would be much easier and application compatibility could be maintained across multiple devices. The slides above illustrate much of what we have outlined here and further explain Intel's strategy and direction.


The individual components within the Intel EP80579 SoCs communicate over an internal Front Side Bus that connects the Processor Core, MCH, and ICH. And Intel has also developed a high performance bus to connect the security, TDM, and data path acceleration engines to the I/O Complex. Please note, that only four of the initial eight products being announced today feature the Acceleration Services Unit and TDM interface represented in the block diagram above. Those features are what make up the Intel QuickAssist Technology, which isn't featured on every Intel EP80579 SoC.


Intel EP80579 Integrated Processor with Intel QuickAssist Technology*

Model

Core Speed

DDR2 (MHz)

Temperatures

L2 Cache

TDP

NU80579EB600C

600MHz

400/533/667

Commercial 0-70°C

256KB

13W

NU80579ED004C

1.066GHz

400/533/667/800

Industrial -40-85°C

256KB

20W

NU80579ED004CT

1.066GHz

400/533/667/800

Commercial 0-70°C

256KB

20W

NU80579ED009C

1.2GHz

400/533/667/800

Commercial 0-70°C

256KB

21W

* Includes security, TDM, and data path acceleration


Intel EP80579 Integrated Processor for Embedded Computing

Model

Core Speed

DDR2 (MHz)

Temperatures

L2 Cache

TDP

NU80579EZ600C

600MHz

400/533/667

Commercial 0-70°C

256KB

11.5W

NU80579EZ600CT

600MHz

400/533/667

Industrial -40-85°C

256KB

11.5W

NU80579EZ004C

1.066GHz

400/533/667/800

Commercial 0-70°C

256KB

18W

NU80579EZ009C

1.2GHz

400/533/667/800

Commercial 0-70°C

256KB

19W


The eight individual products that will initially make up the Intel EP80579 Integrated Processor family are listed in the charts above. As you can see the products will be offered in a range of speeds, power dissipation, and commercial / industrial temperature options.

In addition to the products Intel spoke about today, the company also disclosed that they have more than 15 SoC projects currently planned internally--many of which are built around the Atom core-- including the company’s first Consumer Electronics (CE) chip codenamed “Canmore”, which is scheduled for introduction later this year, and the second-generation “Sodaville” which should hit sometime in 2009. As we've mentioned in previous articles, Intel’s second-generation embedded product line is slated to arrive in 2009 as well, with the company's next-gen platform for Mobile Internet Devices code-named “Moorestown”.

Regardless of all of the codenames and announcements though, what all of this means to consumers is that Intel is obviously focused on securing design wins in virtually any type of device that connects to the Internet or runs software and we may not be too far off from pocket-sized MIDs that can run off the shelf OSes and applications, just like our desktop PCs.

Source: www.hothardware.com

Wednesday, July 23, 2008

How To Reset Linux Forgotten Root Password

1.0 Introduction

Suppose you have just taken over as a new system administrator from another person just before they left and they forgot to give you the root password. Now, let's say you have to install the latest version of PHP on the system so that the sales department's website works the way its supposed to. You have to get the website up yesterday, since you are losing money every minute it doesn't work. Or maybe you simply need to add another user to the system.

The above scenarios are just two possible cases when you might need to reset the root password on a system; there are hundreds of other possible cases when you might need to do this, but I am not going to list all of them. Most of us know what to do when something like this happens on a Windows machine, but not a lot of us know how to recover lost passwords from Linux machines. This document attempts to rectify this situation by telling you about the different options available to recover passwords from YOUR machines. (Don't use this to break into other people's systems as that would be stupid and will get you into big trouble if you are caught.)

1.1 Disclaimer

Use the information in this document at your own risk. I disavow any potential liability for the contents of this document. Use of the concepts, examples, and/or other content of this document is entirely at your own risk.

The information in this document should only be used to recover passwords from machines to which you have legal access. If you use this information to break into other people's systems, then I am not responsible for it and you deserve your fate when you are caught. So don't blame me.

You are strongly advised to make a backup of your system before performing any of the actions listed in this document.

1.2 Credits

In this version, I have the pleasure of acknowledging the following people without whose input this would have never seen the light of the day:

  • The community at http://www.justlinux.com, for the really helpful debate about this topic in one of their threads.
  • The creators and maintainers of the various Linux documentation sites using which I gathered this information.
  • Matt Hoskins and Kevin Walsh, for getting me interested in Linux in the first place.
  • My friends and family, for bearing with me when I was compiling this document.

1.3 Before you start

Before you attempt to change or replace the password of any machine, make sure you get permission from the management authorizing it, 'cause otherwise it can be mistaken as an attempt to hack into the machine, which is not good.

Secondly, create a backup of all important data before you do anything else, so if anything goes wrong you'll still have a copy of your data. If you didn't, and something went wrong, don't blame me. I tested most of this stuff on my system and it worked, but you are responsible for your system, not me, so don't blame me if something did go wrong.

2.1 Various Options available

There are various methods available for resetting a root password. In this section, I will list all the major ones, and we will go over each in detail later in the document. I will also go over some steps to prevent some other person from doing this and hacking your machine.

The various methods are:

  • Boot into single-user mode (easiest, least risky)
  • Boot using a boot disk and edit the password file
  • Mount the drive on another computer and edit the password file

2.1.1 Reseting passwords by booting into single-user mode

This is the easiest and the fastest method to reset passwords. The steps are a little different depending on if you are using GRUB or LILO as a bootmanager.

Booting into single-user mode from LILO

Follow these steps to reset the password when using LILO:

  • Reboot the system. When you see the LILO: prompt (see Fig. 1 below), type in linux singlelinux init=/bin/bash instead. and press 'Enter'. This will log you in as root in single-user mode. If your system requires you to enter your root password to log in, then try
  • Once the system finishes booting, you will be logged in as root in single-user mode. Use passwd and choose a new password for root.
  • Type reboot to reboot the system and then you can login with the new password you just selected.
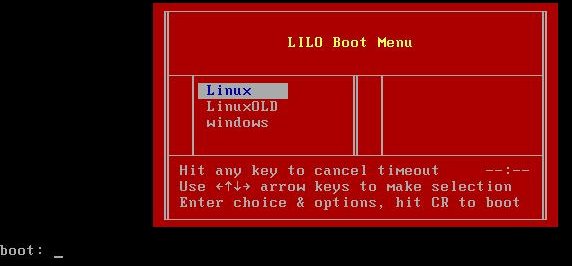
Lilo Boot Menu
Figure 1. Lilo Boot Menu

If you have a new version of LILO which gives you a menu selection of the various kernels available press Tab to get the LILO: prompt and then proceed as shown above.

Booting into single user mode from GRUB

Follow these steps to reset the password when using GRUB:

  • Reboot the system, and when you are at the selection prompt (See Fig. 2 below), highlight the line for Linux and press 'e'. You may only have 2 seconds to do this, so be quick.
  • This will take you to another screen where you should select the entry that begins with 'kernel' and press 'e' again.
  • Append ' single' to the end of that line (without the quotes). Make sure that there is a space between what's there and 'single'. If your system requires you to enter your root password to log into single-user mode, then append init=/bin/bash after 'single'. Hit 'Enter' to save the changes.
  • Press 'b' to boot into Single User Mode.
  • Once the system finishes booting, you will be logged in as root. Use passwd and choose a new password for root.
  • Type reboot to reboot the system, and you can login with the new password you just selected.
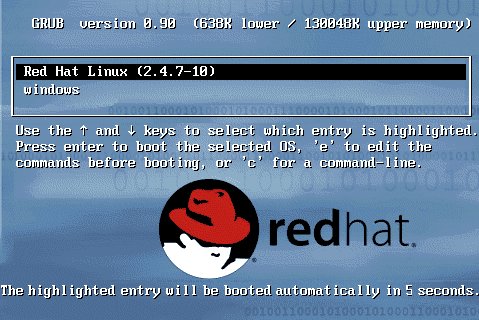
GRUB boot screen
Fig. 2: GRUB Boot Screen

2.1.2 Reseting passwords by using a boot disk and editing the password file

This method is a little bit more complicated than the previous one and has a very high chance of success (assuming your filesystem is not encrypted and you didn't forget the password to decrypt it if it is). As before, get permission before you do this.

To start, you need a Linux boot disk or a rescue disk. (If you didn't create one when prompted during the installation then let this be a lesson for you.) You can use your installation CD as a rescue disk; most distros have an option to allow you to boot into rescue mode. With my Redhat Linux CD, I have to enter linux rescue to start the rescue mode. But this might be a bit different in each distro. You can also use a live linux CD like Knoppix or Gnoppix for system recovery. (Click here for a list of all the live Linux CD's). In this tutorial I will use Knoppix as my rescue CD but the process is almost the same for any rescue CD you might use.

[ You can also download one of the many single-floppy Linux distributions (e.g., Tom's RootBoot ), and use it to bring up the machine as described. This is, of course, much faster than downloading and burning a rescue CD, especially on a slow connection. -- Ben ]

Follow these steps to reset the password using Knoppix:

  • Reboot the system and configure it to boot from the Knoppix CD (instructions available here)
  • At the Knoppix Boot Prompt (See Fig. 3 below) enter: knoppix lang=us to start boot Knoppix using the english locale. If you understand German, feel free to just hit 'Enter' to boot into Knoppix.
  • Once the system finishes booting, press + + (The Control, Alt and F1 key together) to switch to a virtual terminal.
  • Type mkdir mountplace to create a directory called 'mountplace'. This is where we will mount the filesystem.
  • Type mount /dev/hdaX mountplace, where /dev/hdaX is your root partition. More information on Linux partitions is available here.
  • Change to the "/etc" directory on your root partition by typing cd mountplace/etc.
  • Use your favorite text editor and open the 'shadow' file for editing. I use 'vi', so I type vi shadow (If you have a really old system, you won't have a shadow file, in which case you need to edit the 'passwd' file.)
  • Scroll down to the line containing the root user's information, which looks something like:
    root:dsfDSDF!s:12581:0:99999:7:::
  • Delete everything between the first and second colons, so that the line looks like:
    root::12581:0:99999:7:::
  • Save the file and exit your editor.
  • Type cd to return to your home directory.
  • Type umount mountplace to unmount the partition.
  • Type reboot to reboot your system, and remove the Knoppix CD from the drive.
  • Now you can log into your system as root with no password. Make sure you change the password immediately.
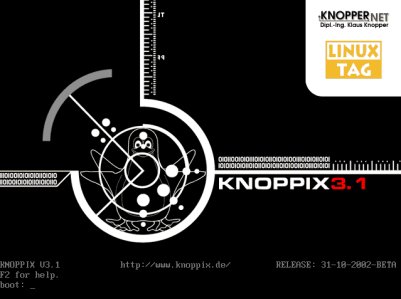
Knoppix boot screen
Fig. 3: Knoppix Boot Screen

2.1.2 Reseting passwords by mounting on another system and editing the password file

This option is a bit more work than any of the earlier options but is almost sure to work (except when the filesystem is encrypted).

Follow these steps to reset the password:

  • Shut down the machine after backing up all important data.
  • Open the casing, unplug the hard drive, and take it to another machine. (This system should be running Linux, since Windows can't read the Linux partition formats.)
  • Connect the hard disk as a slave drive and boot the new system.
  • Once the system finishes booting, mount the slave drive's root partition as shown above and edit the password file.

3.1 How to Prevent someone else from reseting your root password

If you are an even slightly security-consious sysadmin, the previous sections must have set off alarms while you were reading them. Is it really that easy to hack Linux? Yes and No. It all it comes down to the following: Physical Access is Root Access. Meaning, if you give someone physical access to a system, then you are giving them a very good chance of getting root access on your box. This is true for Windows, Linux, or any other OS out there.

But... you say that you need to give some people physical access to the server? There are some precautions you can take to slow down attackers and stop the noob's. In this section I will talk about various ways you can make your computer more secure against these types of attacks. So lets get started.

3.1.1 Password protecting GRUB and LILO

First, edit the /etc/inittab file and insert the following line, right after the "initdefault" line: ~~:S:wait:/sbin/sulogin. This will require a password to boot into single-user mode by making init run 'sulogin' before dropping the machine to a root shell. 'sulogin' requires the user to input the root password before continuing.

Unfortunately, the above step won't protect us against people who know what they are doing and pass init=/bin/bash to the kernel at the LILO prompt. To prevent unauthorized access I would suggest that you password protect LILO/GRUB by following these steps:

How to Protect LILO:

  • Open a shell prompt and log in as root
  • Open /etc/lilo.conf in your favorite text editor
  • Add the following line before the first image stanza: password= , where is your password.
  • Run /sbin/lilo -v to let the changes take effect
  • Type chmod 600 /etc/lilo.conf to give only root access to read and edit the file since all passwords are in plain text
  • Relax a bit, as your system is a little bit more secure

How to password-protect GRUB

  • Open a shell prompt and log in as root
  • Type /sbin/grub-md5-crypt and press enter
  • Enter the password you chose for GRUB when prompted. This will return an MD5 hash of your password
  • Open /boot/grub/grub.conf in your favorite text editor
  • Add password --md5 below the timeout in the main section (Replace with the hash you got in the previous step)
  • Save and exit
  • The next time you reboot, the GRUB menu will not let you access the editor or command interface without first pressing [p] followed by the GRUB password.

3.1.2 Password-protecting the BIOS

There are two primary reasons for password-protecting the BIOS of a computer:

  • Prevent Changes To BIOS Settings: if an intruder has access to the BIOS, they can set it to boot off of a diskette or CD-ROM.
  • Prevent Booting the System: Some BIOSes allow you to password protect the boot process itself. When activated, an attacker would be forced to enter a password for the BIOS to launch the boot loader.

Because the methods for setting a BIOS password vary between computer manufacturers, you should consult the manual for your computer. If you forget the BIOS password, it can often be reset either with jumpers on the motherboard or by disconnecting the CMOS battery. However, you should check the manual for your computer or motherboard before attempting this procedure.


By Suramya Tomar

Sudo Accessible Commands Report

The Linux sudo command allows a permitted user to execute a command as the superuser or another user, as specified in the /etc/sudoers file.

To find out what are the commands granted, just execute the sudo -l command, which essentially output all commands granted into a single long line.

If there are only few commands granted, that is fine to read out what are the commands granted, or find out any possible typo errors of the command name maintained in the /etc/sudoers file.

However, if there are few ten of commands granted, it is not that easy to read the sudo -l output, which list all the granted commands in a single line.

Well, there are two solutions to this irritating problem.

  1. Execute sudo -l | grep --color=auto tar command, which will highlight (in color) the matched keyword found in the single long line of commands granted.

  2. Download the wsudo.sh scripts file, which will breakdown individual commands output by sudo -l into multiple lines. Just type wsudo.sh to get a formatted version of sudo -l report, or pipe the output to grep or sort command. For example, wsudo.sh | grep tar or wsudo.sh | sort.

The first attempt is always simple enough. To make it more simple, create a simple shell scripts containing these lines below, and keep this scripts file in any directory path reported by $PATH environment variable.

#!/bin/sh

sudo -l | grep --color=auto $1


Assuming this scripts file saved as wsudo file name, then to find out whether the tar command is granted, just type wsudo tar at command prompt.


Source:bloggerdigest.

How To Reset Windows Vista Account Password using Trinity RSK

Copyright © reserved by Walker

Today, I found another trick and tested it successfully on my own Windows Vista UltimateThe Trinity Rescue Kit or TRK!
machine -
Trinity Rescue Kit is a tiny Linux distribution that used to repair or recover both Linux and Windows operating system, including the ability to reset a forgotten Windows Vista Administrator account password

In fact, there is a proven video demo of using Trinity Rescue Kit to reset a forgotten Windows Vista administrator account password. Beside Windows Vista editions, the TRK is said works well to reset account password in Windows 2000, Windows XP, and Windows 2003 too.

Cautions! It’s illegal (with most countries cyber laws, I think) to crack or reset another Windows logon account password that is not yours. The Trinity Rescue Kit is only a really good toolkit for those who want to reset a forgotten Administrator account password which is under his/her administration or ownership!

How to crack or reset a forgotten Windows Administrator account password with Trinity Rescue Kit in 3 minutes?

Download the latest Trinity Rescue Kit 3.2 Build 279 from the TRK official home page.

Make sure you’re downloading TRK ISO image file and validate its MD5 checksum with the published one (to confirm the ISO image is genuine and safe!)

Burn the TRK ISO image to a blank CD, which is less than 105MB in size.

Boot up Windows Vista machine with the Trinity Rescue Kit CD-ROM and wait for the tiny Linux loading completely to system memory.

Type winpass -u Administrator at the command prompt. To reset a Windows Vista Administrator account called Admin, just replace Administrator as Admin will do.

The winpass command will then displaying message that resemble these:

Searching and mounting all file system on local machine
Windows NT/2K/XP installation(s) found in:
1: /hda1/Windows
Make your choice or ‘q’ to quit [1]:

In this case, type 1 and press ENTER or just hit ENTER key to accept the default value, i.e. [1].

Next, it’s time to reset password of the specified Windows Vista account. The Trinity Rescue Kit suggests resetting it to a blank password that might work better than setting a new password! So, just type * (asterisk key) and hit the ENTER key to reset a blank or empty password for the specified Windows account.

Then, type Y and press ENTER key at the “Do you really wish to change it?” message prompt.

Now, type init 0 to shutdown the Trinity Rescue Kit Linux system, take out the CD-ROM and boot into Windows Vista Ultimate again.

This time, your Windows Vista should have automatically logged on with Administrator account without asking for a forgotten password!