Source: astahost.com
The BIOS;
Your computers BIOS is the first program that is run when your computer starts.
You can tell the BIOS to ask for a password when it starts, thus restricting access to your computer.
In most cases , It will Be Your Parents/Relative's.
Learn how to bypass it
Their Are 2 Ways Of Doing This. ;
1) Using a Backdoor BIOS Password
Some BIOS manufacturers implement a backdoor password. The backdoor password is a BIOS password that works, no matter what the user sets the BIOS password to. These passwords are typically used for testing and maintenance. Manufacturers typically change the backdoor BIOS passwords from time to time.
AMI Backdoor BIOS Passwords
Reported AMI backdoor BIOS passwords include A.M.I., AAAMMMIII, AMI?SW , AMI_SW, BIOS, CONDO, HEWITT RAND, LKWPETER, MI, and PASSWORD.
Award Backdoor BIOS Passwords
One reported Award backdoor BIOS password is eight spaces. Other reported Award backdoor BIOS passwords include 01322222, 589589, 589721, 595595, 598598 , ALFAROME, ALLY, ALLy, aLLY, aLLy, aPAf, award, AWARD PW, AWARD SW, AWARD?SW, AWARD_PW, AWARD_SW, AWKWARD, awkward, BIOSTAR, CONCAT, CONDO, Condo, condo, d8on, djonet, HLT, J256, J262, j262, j322, j332, J64, KDD, LKWPETER, Lkwpeter, PINT, pint, SER, SKY_FOX, SYXZ, syxz, TTPTHA, ZAAAADA, ZAAADA, ZBAAACA, and ZJAAADC.
Phoenix Backdoor BIOS Passwords
Reported Phoenix BIOS backdoor passwords include BIOS, CMOS, phoenix, and PHOENIX.
Backdoor BIOS Passwords from Other Manufacturers
Reported BIOS backdoor passwords for other manufacturers include:
VOBIS & IBM = merlin
Dell = Dell
Biostar = Biostar
Compaq = Compaq
Enox = xo11nE
Epox = central
Freetech = Posterie
IWill = iwill
Jetway = spooml
Packard Bell = bell9
QDI = QDI
Siemens = SKY_FOX
SOYO = SY_MB
TMC = BIGO
Toshiba = Toshiba
2) Resetting the BIOS Password using Software
Every system must store the BIOS password information somewhere. If you are able to access the machine after it has been booted successfully, you may be able to view the BIOS password. You must know the memory address where the BIOS password is stored, and the format in which the BIOS password is stored. Or, you must have a program that knows these things.
You can write your own program to read the BIOS password from the CMOS memory on a PC by writing the address of the byte of CMOS memory that you wish to read in port 0x370, and then reading the contents of port 0x371.
!BIOS will recover the BIOS password for most common BIOS versions, including IBM, American Megatrends Inc, Award and Phoenix.
CmosPwd will recover the BIOS password for the following BIOS versions:
* ACER/IBM BIOS
* AMI BIOS
* AMI WinBIOS 2.5
* Award 4.5x/4.6x/6.0
* Compaq (1992)
* Compaq (New version)
* IBM (PS/2, Activa, Thinkpad)
* Packard Bell
* Phoenix 1.00.09.AC0 (1994)
* Phoenix 4 release 6 (User)
* Gateway Solo - Phoenix 4.0 release 6
* Toshiba
* Zenith AMI
Showing posts with label Tweak-Guides. Show all posts
Showing posts with label Tweak-Guides. Show all posts
Thursday, July 17, 2008


Thursday, July 3, 2008
Aero Dynamic v3 A0 Theme
Labels:
Tweak-Guides

I haven’t seen a great Vista theme like this for a while. I think if there where more themes like this then more people would make the switch to Vista. I love the color coordination of the this package. All the different shades of grey and blue work perfectly together. I love the taskbar and how the Start button adds a little color to the whole scene. I know that the creator of this theme has an amazing habit of creating great looking designs. Keep up the great work.
Are you still using Windows XP? If you want to use this theme on XP, then you have to download the XP Theme Patcher. If you’re using Windows Vista, you don’t need the Theme Patcher.
Title: Aero Dynamic v3 A0
Author: downtheory
Download:
Download Vista Aero Dynamic v3 A0 for Vista Here
Source: windowsvistaplace
How to Customize your OEM Information
Labels:
Tweak-Guides
Did you ever wonder how HP, DELL, SONY, ASUS, FUJITSU , ACER, LENOVO laptops and PC's put their Logo and information to your System Properties?
Branding your Windows XP was easy. You can Add, modify and change it's Original Equipment Manufacturer settings by only modifying two files. When Windows Vista came, It needs you to modify some registry settings that you need to memorize all the keys and it is not advisable for Beginners. Solution: Now you can do it in just two clicks or If you feel that it's better to do it manually, No Problem!
Here's How...
Using a Software to Add or Change it in just Two Clicks!
Using the Latest version of 2008/01/winguggle-get-your-windows-vista.html" >WinGuggle that works with Windows XP and Vista. You can experiment with it... It's easy!

What's the cool thing about WinGuggle? It automatically backs-up your OEM Information, If you have it by default. If not, you will be ask, if you want to back-up the logo and information as default or not. And later If you want to reset and restore the original settings, Just Click the "Reset to Default" Button. That's it!
NOTE:
Logo Specification: 256-colour bitmap file (.BMP) about 180 wide x 120 high
Windows Vista
A Complete guide in Customizing your Welcome Screen and System Window: 2008/01/branding-your-windows-vista-computer.html">Branding your Windows Vista Computer
Do it Manually: Don't worry Geeks, here:
2007/11/customizing-oem-logo-in-windows-vista.html">Customizing OEM Logo in Windows Vista
Windows XP
Ok, it seems this is old but still many users don't know much about it.
Add or Change it Manually
1. Go to Windows\System32 Folder > find OEMinfo.ini and OEMLogo.bmp
2. Modify OEMinfo.ini using the format below:
===========================================
[General]
Manufacturer=Dell Inc.
Model=Latitude D630
[Support Information]
Line1=
Line2=
Line3=HTTP://friedfly.blogspot.com
Line4=Please Visit my website... Thank you very much!
===========================================
3. If you can't find the file, Open the notepad > Paste the Information above and just change it > Save the file as OEMInfo.ini
4. Open OEMlogo.bmp in Paint or any Graphics editor and Paste the Picture that you want.
5. If you can't find the file, Just create a 256-colour bitmap file (.BMP) about 180 wide x 120 high and save it as OEMlogo.bmp to Windows\System32 Folder. Anyway, there is no problem if the picture is large. It will be cropped automatically.
(source:www.windowsvistaplace.com)
Thursday, May 22, 2008
Flashboot
Labels:
Tweak-Guides,
Windows Apps
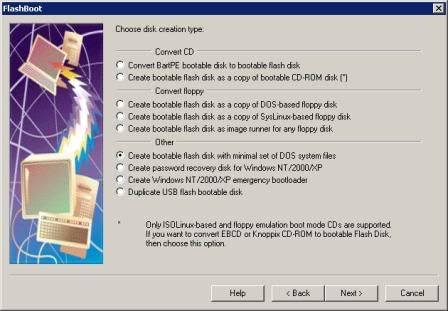
FlashBoot is a tool to create bootable USB disks, USB Flash Memory keys and cards mainly. What are the benefits of such devices for you? Let’s see: unlike the most bootable medias, bootable USB Flash keys are very handy: compared to floppies, they have much bigger size, speed and reliability, compared to CD-ROMs, they are random write access devices, so you can backup your data to the same media where you booted from, without need to reformat (reburn) the entire media. Also, the cost per MB for them continues to cut down lately, which is not the case for floppies and CD-ROMs...
Get a copy: look for the link... or google it! =)
Wednesday, May 14, 2008
Install Windows XP on Your Pre-Installed Windows Vista Computer
Labels:
Tweak-Guides
The question I am asked most often is "How do I install a dual-boot with Windows XP on my new Windows Vista computer?" The answer is that it's not that difficult, it's just very time consuming, and you need to own a copy of Windows XP.
Note that you should not attempt this if you aren't ready to troubleshoot any problems that might occur.
The first issue we encounter is that computers with pre-installed operating systems take up the entire drive. Luckily Microsoft included the Shrink volume feature in Vista, so we can easily shrink the Vista partition down to make room for XP.
Open the Computer Management panel, which you can find under Administrative tools or by right-clicking the Computer item in the start menu and choosing Manage. Find the Disk Management item in the list and select that.

Now we'll shrink our volume down by right-clicking on the main hard drive and choosing Shrink Volume.

Now you can choose the size that you want to shrink, which really means you are choosing the size that you want your XP partition to be. Whatever you do, don't just use the default. I chose roughly 10gb by entering 10000 into the amount.

The next step might be confusing, because we need to change the cd-rom drive that's invariably taking up D: at the moment, because we want to use D: for the Windows XP partition, but it's already taken by the cd-rom drive. If you skip this step than XP will install onto the E: drive, which isn't the end of the world, but it's not quite as tidy.
Right-click on the cd-rom drive in the list and choose Change Drive Letter and Paths from the menu.

Now we'll change the CD drive to use E: by selecting that in the drop-down.

Now we can create a new partition for XP to live on and make sure that the drive letter is set the way we want. If you do not create a partition now the XP install will do so automatically, but it's easier and cleaner to do it this way.
Right-click on the Unallocated free space area and then select New Simple Volume from the menu.

Follow through the wizard and select whatever options you'd like, making sure to use D: as the drive letter.
Now you will need to close out of disk management and reboot your computer. This is because we can't do the next step until we reboot. (you can try, but it won't work)
So we've come back from rebooting… open up Computer from the start menu and then right-click on the D: drive and select properties. Give your partition a meaningful name like "XP". It would be wise to name the C: drive to "Vista" at this point as well.

Now you'll want to pop your XP cd into the drive and boot off it. You may have to configure your BIOS to enable booting off the CD drive, or if your computer says something like "Hit Esc for boot menu" you might want to use that.
Once you come to the screen where you can choose the partition to install on, then choose either the unpartitioned space or the new partition you created. Whatever you do, don't try and install onto your Vista partition! See how much cleaner it is now that we've labeled each partition distinctly?

We'll assume XP is completely installed at this point, and you will have lost your ability to boot into Windows Vista, so we'll need to use the VistaBootPro utility to restore the Vista boot loader.
Download and install VistaBootPro from vistabootpro.org
During the install you'll be forced to install the .NET 2.0 framework. Open up VistaBootPRO and then click on the System Bootloader tab. Check the "Windows Vista Bootloader" and then "All Drives" radio buttons, and then click on the Install Bootloader button.

At this point, the Windows Vista bootloader is installed and you'll only be able to boot into Vista, but we'll fix that. Instead of manually doing the work, we'll just click the Diagnostics menu item and then choose Run Diagnostics from the menu.

This will scan your computer and then automatically fill in the XP version.. click on the "Manage OS Entries" tab and then click in the textbox for Rename OS Entry, and name it something useful like "Windows XP" or "The Windows That Works"
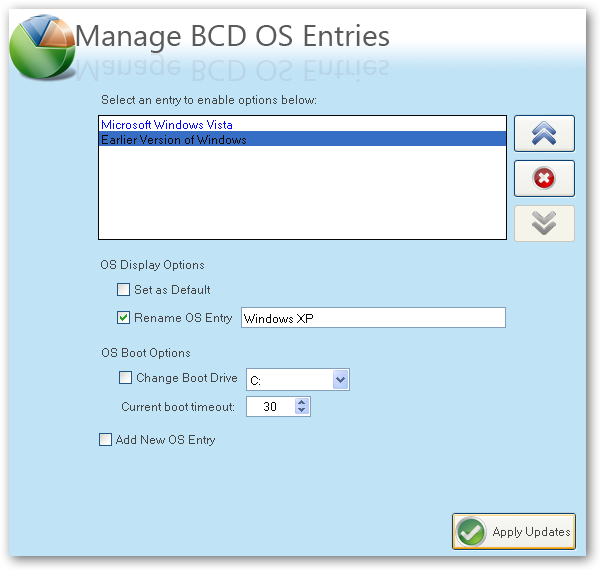
Click the Apply Updates button and then reboot your computer… you should see your shiny new boot manager with both operating systems in the list!

If you get an error saying "unable to find ntldr" when trying to boot XP, you'll need to do the following:
- Find the hidden files ntldr and ntdetect.com in the root of your Vista drive and copy them to the root of your XP drive.
- If you can't find the files there, you can find them in the \i386\ folder on your XP install cd
This is a critical piece of information: Windows XP will be installed on the D: drive, even in Windows XP… so you'll need to keep that in mind when tweaking your system.

You can share information between the drives, but I wouldn't recommend messing with the other operating system's partition too much… it might get angry and bite you. Or screw up your files. What I do recommend is that you store most of your files on a third drive shared between the operating systems… you could call that partition "Data".
I'm going to write a number of followup articles dealing with all of the issues with dual-boot systems, so subscribe to the feed for updates. (www.howtogeek.com)
Resize a Partition for Free in Windows Vista
Labels:
Tweak-Guides
Windows Vista includes a built-in functionality in Disk Management to shrink and expand partitions. No more 3rd party utilities needed!
To get to this utility, open up Control Panel, and type in partition into the search box.. you'll immediately see the link show up:

Shrink a Partition
In the Disk Management screen, just right-click on the partition that you want to shrink, and select "Shrink Volume" from the menu.
In the Shrink dialog, you will want to enter the amount you want to shrink by, not the new size. For example, if you want to shrink your 50gb partition by roughly 10gb so that it will now be roughly 40gb, enter 10000 into the box:

Extend a Partition
In the Disk Management screen, just right-click on the partition that you want to shrink, and select "Extend Volume" from the menu.

On this screen, you can specify the amount that you want to increase the partition by. In this case, I'm going to extend it back to the roughly 50GB size that it was before.
Note that the extend partition feature only works with contiguous space.
"Setup did not find any hard disk drives" during Windows XP Installation Resolved!
Labels:
Tweak-Guides
One of the most popular topics among our readers is installing Windows XP on your new Windows Vista computer - sometimes for compatibility reasons, but also because a lot of people just don't like Vista very much.
The problem that people keep running into left and right is getting to the point where XP starts to install and getting the message "Setup did not find any hard disk drives installed in your computer". This error happens because your new computer has a storage controller that isn't supported natively in XP, usually an SATA (Serial ATA) controller.
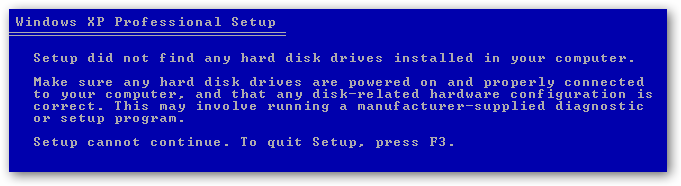
If you don't have a floppy drive in your computer (who does anymore), then you'll need to use a process called slip-streaming to integrate the storage drivers into your XP installation CD.
It should go without saying that this is an advanced topic, so proceed with caution.
Creating a Custom XP Install
We'll use a software called nLite to create a new XP install cd, so you'll first need to download and install it. Once it starts up, you'll be prompted for your Windows installation, so you'll want to click the Browse button.

First you'll be prompted for the "Windows installation", which really means your XP install CD. Find it and select the root of the installation, and then click OK to go to the next dialog.

Next you'll be prompted on where you want to save the temporary files used during the slip-streaming process. I chose to create a new directory and called it XPISO, but you can put it wherever you'd like. I just recommend to use a new directory.

nLite will copy all the necessary files off the XP installation and into the temporary folder. When it's done, you'll see all the information on which version it is.


Hit the next button until you come to this screen, where you can select what options you want. Select "Drivers" and then "Bootable ISO".

Side note: You can select any of the other options if you'd like. nLite will let you bundle updates, set tweaks or automatically remove components from the installation, but that all goes beyond the scope of this article.
Hit the next button until you get to the screen for selecting drivers. If you click the Insert button, you can choose between adding a single driver or adding a folder of drivers. Since we'll just be loading a single driver, you can choose that option, but you might want to first read the section below about finding drivers for XP.


Browse to the directory where you extracted the driver files, and then select Open. Note that it doesn't really matter which of the *.inf files you choose, because it will select all files in the folder anyway.

nLite will prompt you to select your driver. If you don't know which exact one it is, you can either use Device Manager in Vista to find the exact model, or you can just select all of them. Just be careful not to select a 64-bit driver if you are using 32-bit, or the wrong OS version.

I would recommend including both Storage and Network drivers, as those are the most common drivers that are missing in XP. 
Once you proceed to the next screen, now we can finally finish the process. You can choose to directly burn the cd here, or you can select Create Image to create an ISO file that you can burn to a CD using whatever burning tool you have.
Note: If you chose to create an ISO, make sure to use the "Make ISO" button before you click Next.


At this point you can burn the ISO image to a CD, and then start your XP installation process.
Finding Drivers for XP
The best place to search for drivers for your hardware is at the manufacturer's support website. The only problem is that almost every manufacturer seems to distribute their drivers in floppy disk image form, even though the computer they are for doesn't have a floppy drive. Guess nobody has alerted them to get with the program.
We can still extract the drivers using an application called WinImage. Let's run through a quick example… Here you can see the Intel SATA controller driver for my HP computer.

I downloaded and ran the executable, which extracted a file called f6flpy32.exe into a temporary directory. Don't bother trying to run this one, because it'll just prompt you for a floppy drive.

So how to get the drivers out of this file? There are a few options that you can try, depending on how the manufacturer packed the files.
- You can use Winimage to extract them, which is a shareware software, but you can use it during the trial period for free.
- You can try and use WinRar to extract the file. In many instances this will extract a *.flp file, which you can mount in a VMware virtual machine or potentially with some ISO mounting software.
- Some drivers will allow you to automatically extract into a directory. You'll have to try it and see what happens.
- Other methods? If you've got other ideas, leave them in the comments and I'll add them to this list.
Here's the list of files that Winimage can handle, which is quite a lot.

Start WinImage and then open the file, and you should see the contents. Just extract them to a folder, preferably with a useful name so you can remember it later.

Good luck! by: howtogeek.com
Mac Wireless
Labels:
Tweak-Guides
Mac OS X Instructions for Wireless
NOTE: We have trouble setting up wireless access on OS 10.4.5, 10.4.6 and newer versions. Versions of OS 10.4.4 and earlier work fine.
- Click on the Wi Fi symbol in the upper right corner of the screen.
- A pull-down menu should appear. Make sure Airport is on.
- Click on Other.
- The Close Network menu should appear.
- In Wireless Security menu choose WPA Enterprise.
- May need to choose LEAP in some cases - if WPA Enterprise does not work
- Enter 5210 as the Network Name.
- Enter your campus username and password where prompted.
- Make sure the 802.11X configuration box is set to Automatic.
- Click OK.
If the above instructions do not work:
- Under the Airport menu, select Open Internet Connect...
- Click on 802.1X in the toolbar.
If you do not see the toolbar, click on the white or blue oval, "tic-tac" looking button in the top right corner of the window. If you do not see an 802.1X icon, click on File, then New 802.1x Connection... The 802.1x Connection Window will appear.
- Under the "Configuration" pull down menu, select Edit Configurations...
- Click on the + (plus) button in the lower left-hand corner.
Fill in the displayed fields with the following information:
-
- Description: 5210
- Network Port: AirPort
- User Name: enter your UA Fort Smith userid
- Password: enter your UA Fort Smith password
- Wireless Network: 5210
- Authentication: PEAP (NOTE: Only check PEAP)
- Click OK to exit the Internet Connect configuration.
- Click Connect.
You may be asked to accept a certificate the first time you connect. If so, the certificate will be issued by UA Fort Smith and GeoTrust.
-
- Click Continue.
Troubleshooting tip: If you receive an "Invalid certificate" message when attempting to connect, make sure you only checked PEAP.
Wednesday, April 23, 2008
Installing Windows XP on the Asus EEE PC USB flash drive
Labels:
Tweak-Guides
Installing Windows XP on the Asus EEE pc using a single USB flash drive.

To complete this tutorial you need a 32bit version of Windows XP or Windows Vista installed on your home PC.
What you'll need:
USB_PREP8 (alternative download)
PeToUSB (alternative download)
Bootsect.exe (alternative download)
Special Note: If you use the program Nlite be sure to keep the manual installation files as the USB_prep8 script relies on these files.
Extract the files in Bootsect.zip
The next step is to extract USB_prep8 and PeToUSB.
Next copy the PeToUSB executable into the USB_prep8 folder.
Inside of the USB_prep8 folder double click the executable named usb_prep8.cmd.
The window that opens will look like this:

Press any key to continue
You next window will look like this:
These settings are preconfigured for you all you need to do now is click start.
Once the format is complete DO NOT close the window just leave everything as it is and open a command prompt from your start menu (type cmd in the search bar or run box depending on your version of windows.).
Inside of the command windows go to the directory you have bootsect.exe saved.
(use the cd directoryname command to switch folders)
Now type "bootsect.exe /nt52 R:" NOTE R: is the drive letter for my USB stick if yours is different you need to change it accordingly. What this part does is write the correct boot sector to your USB stick, this allows your PC to boot from the USB stick without it nothing works.
Please note: When running the bootsect.exe command you cannot have any windows open displaying the content of your USB stick, if you have a window open bootsect.exe will be unable to lock the drive and write the bootsector correctly.
If all went well you should see "Bootcode was successfully updated on all targeted volumes."
Now you can close this command prompt (don't close the usbprep8 one by mistake) and the petousb window.
You window you see now should look like this:

If it doesn't try pressing enter.
Now you need to enter the correct information for numbers 1-3.
Press 1 and then enter. A folder browse window will open for you to browse to the location of you XP setup files (aka your cdrom drive with xp cd in)
Press 2 and enter a letter not currently assigned to a drive on your PC
Press 3 and enter the drive letter of your USB stick
Press 4 to start the process.
The script will ask you if its ok to format drive T:. This is just a temp drive the program creates to cache the windows installation files. Press Y then enter.
Once it's done formating press enter to continue again, you can now see the program copying files to the temp drive it created. Once this is done press enter to continue again.
Next you will see a box pop up asking you to copy the files to USB drive yes/no you want to click yes.
Once the script has completed copy files a popup window asking if you would like to USB drive to be preferred boot drive U: select YES on this window.
Now select yes to unmount the virtual drive.
Ok we are done the hard part, close the usbprep8 window.
Now make sure your EEE pc is configured with USB as the primary boot device.
Insert your USB drive and boot up the EEE.
On the startup menu you have two options, select option number 2 for text mode setup.
From this point on it is just like any other windows XP installation delete/recreate the primary partition on your EEE pc and format it using NTFS. Make sure you delete ALL partitions and recreate a single partition or you will get the hal.dll error message.
Once the text mode portion of setup is complete it will boot into the GUI mode (you can press enter after the reboot if your too excited to wait the 30 seconds)
Once the GUI portion of setup is complete you will again have to boot into GUI mode this will complete the XP installation and you will end up at you XP desktop. It is very important that you DO NOT REMOVE THE USB STICK before this point. Once you can see your start menu it is safe to remove the usb stick and reboot your pc to make sure everything worked.
This method has advantages over all current no cdrom methods of installing XP to the EEE. You do not have to copy setup files in DOS to the SSD and install from there. It gives you access to the recovery console by booting into text mode setup, and it gives you the ability to run repair installations of XP if you have problems later on.
If this is succesfull, please leave a comment!
eeeguides.com

To complete this tutorial you need a 32bit version of Windows XP or Windows Vista installed on your home PC.
What you'll need:
USB_PREP8 (alternative download)
PeToUSB (alternative download)
Bootsect.exe (alternative download)
Special Note: If you use the program Nlite be sure to keep the manual installation files as the USB_prep8 script relies on these files.
Extract the files in Bootsect.zip
The next step is to extract USB_prep8 and PeToUSB.
Next copy the PeToUSB executable into the USB_prep8 folder.
Inside of the USB_prep8 folder double click the executable named usb_prep8.cmd.
The window that opens will look like this:

Press any key to continue
You next window will look like this:

These settings are preconfigured for you all you need to do now is click start.
Once the format is complete DO NOT close the window just leave everything as it is and open a command prompt from your start menu (type cmd in the search bar or run box depending on your version of windows.).
Inside of the command windows go to the directory you have bootsect.exe saved.
(use the cd directoryname command to switch folders)
Now type "bootsect.exe /nt52 R:" NOTE R: is the drive letter for my USB stick if yours is different you need to change it accordingly. What this part does is write the correct boot sector to your USB stick, this allows your PC to boot from the USB stick without it nothing works.
Please note: When running the bootsect.exe command you cannot have any windows open displaying the content of your USB stick, if you have a window open bootsect.exe will be unable to lock the drive and write the bootsector correctly.
If all went well you should see "Bootcode was successfully updated on all targeted volumes."
Now you can close this command prompt (don't close the usbprep8 one by mistake) and the petousb window.
You window you see now should look like this:

If it doesn't try pressing enter.
Now you need to enter the correct information for numbers 1-3.
Press 1 and then enter. A folder browse window will open for you to browse to the location of you XP setup files (aka your cdrom drive with xp cd in)
Press 2 and enter a letter not currently assigned to a drive on your PC
Press 3 and enter the drive letter of your USB stick
Press 4 to start the process.
The script will ask you if its ok to format drive T:. This is just a temp drive the program creates to cache the windows installation files. Press Y then enter.
Once it's done formating press enter to continue again, you can now see the program copying files to the temp drive it created. Once this is done press enter to continue again.
Next you will see a box pop up asking you to copy the files to USB drive yes/no you want to click yes.
Once the script has completed copy files a popup window asking if you would like to USB drive to be preferred boot drive U: select YES on this window.
Now select yes to unmount the virtual drive.
Ok we are done the hard part, close the usbprep8 window.
Now make sure your EEE pc is configured with USB as the primary boot device.
Insert your USB drive and boot up the EEE.
On the startup menu you have two options, select option number 2 for text mode setup.
From this point on it is just like any other windows XP installation delete/recreate the primary partition on your EEE pc and format it using NTFS. Make sure you delete ALL partitions and recreate a single partition or you will get the hal.dll error message.
Once the text mode portion of setup is complete it will boot into the GUI mode (you can press enter after the reboot if your too excited to wait the 30 seconds)
Once the GUI portion of setup is complete you will again have to boot into GUI mode this will complete the XP installation and you will end up at you XP desktop. It is very important that you DO NOT REMOVE THE USB STICK before this point. Once you can see your start menu it is safe to remove the usb stick and reboot your pc to make sure everything worked.
This method has advantages over all current no cdrom methods of installing XP to the EEE. You do not have to copy setup files in DOS to the SSD and install from there. It gives you access to the recovery console by booting into text mode setup, and it gives you the ability to run repair installations of XP if you have problems later on.
If this is succesfull, please leave a comment!
eeeguides.com
How to make Bart PE Recovery CD using PE Builder
Labels:
Tweak-Guides
Prepare the Bart PE Recovery CD
First, you’ll need to download the installer for Bart PE. Some guy named Bart Lagerweij has made a program that creates a bootable CD with a mini version of Windows XP on it. He knows his stuff. To download the latest version from his site, go here. If you’re in a hurry, I have archived Bart PE v3.1.10a right here.
Now that you have Bart PE, install it. After it’s installed, you should get a screen similar to this:

Now, download this plugin, known as RunScanner. Since Bart PE is basically a mini version of Windows XP, it has it’s own registry, but you don’t care about editing that, you want to edit the registry of the unbootable machine! RunScanner will load just that upon the startup of Bart PE so it can be done. To download the latest version from the author’s site, go here. If you’re in a hurry, I have archived RunScanner v10015a right here. For those interested, this program is very tweakable. The author has advanced usage instructions on his website here. Now that you’ve downloaded the plugin, please leave it in .CAB form.
Lastly, right-click and save this file: FixLogOnOffLoop.reg. Yep, that little file right over there will save your computer! Please leave the name and file extension alone. Please save this file in its OWN folder on your Desktop.
UPDATE Nov. 12th, 2007: It seems there’s a virus going around, or something. Copy the userinit.exe file from C:\Windows\system32\ directory to the directory you just made on your Desktop above. Only do this if the normal instructions don’t work.
Now that all of that is done, let’s get back to Bart PE.
Pop in your Windows XP CD, close the autorun screen if it pops up, and set the first option to the drive letter that contains your Windows XP CD. Mine in this case, is U:. Next, point the second option to that directory you saved FixLogOnOffLoop.reg to. Mine in this case is C:\Documents and Settings\Wolf\Desktop\PE.

Next, hit F4, or go to Builder -> Plugins. A screen like the one below should come up:

Select Add, then find RunScanner10015a.cab and select it. Scroll down the list and see if it’s there. Also, make sure it’s enabled. After it’s all been checked out, click Close. Set it to burn a CD with CD-Record using your CD burner/writer by clicking Build. Depending on how fast your burner — and your computer in general — is, it should be done in a matter of minutes.
Now that the CD is burnt, it’s time to go over to the computer that is not booting, and fix it up!
Wednesday, March 26, 2008
Read and Write NTFS Windows Partition on Mac OS X
Labels:
Tweak-Guides
Updated: from MacFuse 0.1.0 Beta 6 to 0.1.7
Users running Mac OS X with Bootcamp Windows may struggle to modify or update your documents and files in the Windows partition - usually it is in NTFS File System format which you can read the drive natively in Mac OS X but not write onto it.
Recently Amit Singh, a Google employee, releases a implementation called MacFUSE which makes it possible to use any FUSE (File-system in USErspace) file systems in Mac. And the most useful FUSE is the NTFS-3G Read/Write Driver, which ables system to load NTFS with read and write capability. This is truly the greatest news for dual booting Mac OS X and Windows XP or
Without going into great deal of technical details and compilation of the source code, I found out users around Internet already came up with binary version (in DMG) of MacFUSE and ntfs-3g, ready to install (credit to ShadowOfGed at AppleNova). Here are the instructions on how to use MacFUSE and NTFS-3G. It does require a little of administration skills as it involves running commands in the Terminal.
MacFUSE/NTFS-3G works for me, but as this is an experimental software, so back up your data, and try it at your own risk.
- Download and Install MacFuse 0.1.7 DMG

- Download and Install NTFS-3G 20070116 DMG
- Open the Disk Utility (In Finder -> Application -> Utility folder) and press Umount button on the NTFS volume

- Now, right click on the volume and select “Information”, search for “Disk Identifier” (i.e. disk0s2). Note it.

- Start Terminal and run the the following commands in italic:
- Create symlink for mount_fusefs: sudo ln -s /System/Library/Filesystems/fusefs.fs/mount_fusefs /usr/bin/mount_fusefs
- Create a new directory: mkdir /Volumes/Windows
- Mount the NTFS volume: sudo /usr/local/bin/ntfs-3g /dev/disk0s2 /Volumes/”Windows” -o ping_diskarb,volname=”Windows”
After this step, you should see the Windows volume is mounted and should show on your desktop. Now try to read and write files in the NTFS volume. Have fun and hope you find it useful.
Problems installing Boot Camp under Leopard???
Labels:
Tweak-Guides
Problems installing Boot Camp under Leopard
Several users have reported problems installing Windows XP through Boot Camp under Mac OS X 10.5 (Leopard). In some cases, users are presented with the error "hal.dll (Hardware Abstraction Layer) Missing or Corrupt" or a simple "Disk Error"
MacFixIt reader Skip writes:
"I tried to install windows every way imaginable; convert the partition to NTFS, leave it untouched or delete it and create an NTFS partition and I am still unable to install Windows XP."
There are a few potential solutions to this problem:
- Reformat As described in Knowledge Base article #306504: "After creating a Windows partition in Boot Camp 2.0 in Mac OS X 10.5, then rebooting from the Windows XP installer CD, be sure that you format the Windows partition before continuing with the rest of the Windows XP setup process. Important: Do not use the option named "Leave the current file system intact (no changes)." In other words, for instance: use Boot Camp to partition the drive as FAT32, then follow the instructions to begin the Windows XP install, and when prompted, reformat the partition with the utility as FAT (FAT32).
- Update EFI In some cases, however, users are not being prompted to reformat. The problem may be out-of-date EFI. Make sure that you have the latest revision for your system, available from Apple's download page (search for EFI).
- Modify Windows XP CD As described by Apple Discussions poster Talez: check to see if there is a file named "winnt.sif" inside the I386 folder on the Windows XP CD. If it exists, follow these instructions to rebuild the Windows XP CD. Talez says "Skip steps 2 and 3 (since you already have SP2 built in) and remove the 'winnt.si' file from the I386 folder before going on to step 4."
How to dual-boot Vista with XP - step-by-step guide
Labels:
Tweak-Guides,
Vista Tweaks
Scenario: You want to install Vista on your PC alongside your XP installation, on the same drive. You have already installed XP. (If you installed Vista first, see our other tutorial on How to dual-boot Vista and XP - with Vista installed first.)
Tutorial Summary: We're going to use the DISKPART utility on the Vista DVD to shrink the Windows XP partition on the hard disk and create enough space for an installation of Vista. We'll then install Vista and use the EasyBCD utility to modify Vista's bootloader to get XP loading properly.
This is an updated tutorial,based on our first Windows XP/Vista dual-booting workshop. The main difference is that we're covering using both the latest version of GParted and DISKPART to shrink the Windows XP partition.
DISKPART can shrink NTFS partitions and it's certainly the more convenient option, but on some systems using DISKPART to shrink the volume will fail, with an vague "Access is denied" error.
This may have something to do with different disk controllers, as this was a problem on the AcerPower test system which has a SATA hard drive, but not on the VMWare system which uses a virtual IDE controller. So we'll cover both processes
EasyBCD has also been updated since the first tutorial was written.
This tutorial was tested on a VMWare Workstation 6 virtual machine and an AcerPower SK50.
Get Started - Using GParted
We assume that before you start this tutorial, you have backed up the drive (partitions and data) that will host the two operating systems.
Your first step will be to modify the Windows XP system partition to make space for Vista using GParted
The GParted Live CD ISO is available here – burn it to CD and boot the system from the disc. The version we used was 0.3.4-7.
Boot the Linux machine from the GParted LiveCD. Depending on your system, you should just need to select the auto-configuration boot option.

During boot, press Enter twice when prompted to select the keymap and language settings.
When the main GUI loads, right-click on the main Windows XP NTFS partition (depending on your setup, probably /dev/hda1) and select Resize/Move.
 XP & Vista - Resize Partition |
Use the slider to reduce the partition size and free up enough room to instal Vista (at least 10GB) and click Resize/Move.
 XP & Vista - Resize Partition 2 |
The changes haven’t actually been made, they’ve just been scheduled to run. To commit the changes and resize the partition, click Apply. GParted will ask to confirm the changes – hit OK and away you go.
Get Started - Using DISKPART
Boot the machine from the Vista DVD. Select the appropriate language and then "Install Now".
 XP & Vista - Load Vista |
On the produt key page, press SHIFT + F10 to launch a Windows PE 2.0 command window. Then type in DISKPART and press enter to get into the DISKPART utility.
 XP & Vista - DISKPART |
Now type in LIST VOLUME - this gives you a readout of the volumes available on the system. Select the main Windows XP volume (probably Volume 0) by typing in SELECT VOLUME 0.
 XP & Vista - DISKPART Volume |
Now type in SHRINK. Vista will reduce the size of Volume 0 (the selected Volume) by around 50%.
 XP & Vista - DISKPART Shrink |
Once that is done, type in EXIT and EXIT again to get back to the Vista installation window.
Now Install Vista
If you used the GParted LiveCD to shrink the XP partition, you'll need to reboot the system from the Vista install DVD. If you've used DISKPART then you just need to continue the installation.
Once the install gets to the install location, there should be at least two options: a partition marked as Primary and unallocated space. Select the unallocated space and click Next. The install will then commence.
 XP & Vista - Install Vista |
The Vista boot manager will take over the system completely, and Windows XP effectively loads via Vista. It’s all pretty seamless though, and you shouldn’t encounter any technical problems.
Modify Vista's Bootloader
Once Vista is installed and the system reboots, you’ll be presented with a boot menu with two options: “Microsoft Windows Vista” and “An Earlier Version of Windows”.
 XP & Vista - Boot Menu |
This is perhaps a little bit bland, so you’ll probably want to change it. Here’s where one of the new features of Vista comes in, and it’s not so terrific. In Windows XP if you want to modify the bootloader, just right-click on My Computer, select Properties, go to the Advanced Tab, and click Settings under Startup and Recovery, then click Edit. This opens a local file – boot.ini. It’s just a standard text file and you can change pretty much anything. Unfortunately it’s not that easy in Vista – you can still navigate to the Startup and Recovery settings, but all you can do is select which operating system is the default and modify the timeout settings.
To edit Vista’s boot manager you have to use the command line BCDEDIT utility. To access BCDEDIT, run the Command Window as an administrator and type in BCDEDIT.
Unfortunately BCDEDIT isn’t an easy tool to come to terms with, especially as it’s purely command line-driven. So, a great tool to use here is EasyBCD by NeoSmart Technologies. EasyBCD offers a GUI frontend to BCDEDIT, and makes life much easier.
Once Vista is installed, call up the browser and navigate to the EasyBCD download page - download, install and launch the application.
To configure the bootloader go to “Configure Boot” – you’ll see the two entries, for XP and Vista. To change the name of Windows XP, just overwrite “Earlier Version of Windows” with “Windows XP” and click Save Settings.
 XP & Vista - Modify Boot |
Reboot the system and the changes are visible. You have a dual-booting Vista and XP system. That's all there is to it.
 XP & Vista - Changed Boot |
Open up Windows Explorer and there’s two hard drives – the primary disk running Vista and the secondary disk with XP installed. Restart the system and load up Windows XP, and the XP disk is now the primary, with the Vista partition running on the secondary D: drive
If you decide that dual-booting Vista and XP is not for you, EasyBCD lets you wind back the clock.
All you have to do is remove Vista’s boot manager – go to “Manage Bootloader”, select “Uninstall the Vista Bootloader” and then “Write MBR”. Restart the machine and that’s it – the XP boot loader is the only one left on the system and XP loads. You can then delete the Vista partition and use GParted to re-extend the partition to take up the entire disk, or the Extend command in Vista DISKPART.(source:http://apcmag.com)
Subscribe to:
Posts (Atom)





