Wednesday, March 26, 2008

Read and Write NTFS Windows Partition on Mac OS X

Updated: from MacFuse 0.1.0 Beta 6 to 0.1.7

Users running Mac OS X with Bootcamp Windows may struggle to modify or update your documents and files in the Windows partition - usually it is in NTFS File System format which you can read the drive natively in Mac OS X but not write onto it.

Recently Amit Singh, a Google employee, releases a implementation called MacFUSE which makes it possible to use any FUSE (File-system in USErspace) file systems in Mac. And the most useful FUSE is the NTFS-3G Read/Write Driver, which ables system to load NTFS with read and write capability. This is truly the greatest news for dual booting Mac OS X and Windows XP or Vista.

Without going into great deal of technical details and compilation of the source code, I found out users around Internet already came up with binary version (in DMG) of MacFUSE and ntfs-3g, ready to install (credit to ShadowOfGed at AppleNova). Here are the instructions on how to use MacFUSE and NTFS-3G. It does require a little of administration skills as it involves running commands in the Terminal.

MacFUSE/NTFS-3G works for me, but as this is an experimental software, so back up your data, and try it at your own risk.


MacFUSE Installer


  • Download and Install NTFS-3G 20070116 DMG
  • Open the Disk Utility (In Finder -> Application -> Utility folder) and press Umount button on the NTFS volume

NTFS Mac Umount

  • Now, right click on the volume and select “Information”, search for “Disk Identifier” (i.e. disk0s2). Note it.

20070117-information-disk-mac-ntfs


  • Start Terminal and run the the following commands in italic:
  • Create symlink for mount_fusefs: sudo ln -s /System/Library/Filesystems/fusefs.fs/mount_fusefs /usr/bin/mount_fusefs
  • Create a new directory: mkdir /Volumes/Windows
  • Mount the NTFS volume: sudo /usr/local/bin/ntfs-3g /dev/disk0s2 /Volumes/”Windows” -o ping_diskarb,volname=”Windows”

After this step, you should see the Windows volume is mounted and should show on your desktop. Now try to read and write files in the NTFS volume. Have fun and hope you find it useful.

Problems installing Boot Camp under Leopard???

Problems installing Boot Camp under Leopard

Several users have reported problems installing Windows XP through Boot Camp under Mac OS X 10.5 (Leopard). In some cases, users are presented with the error "hal.dll (Hardware Abstraction Layer) Missing or Corrupt" or a simple "Disk Error"

MacFixIt reader Skip writes:

"I tried to install windows every way imaginable; convert the partition to NTFS, leave it untouched or delete it and create an NTFS partition and I am still unable to install Windows XP."

There are a few potential solutions to this problem:

  • Reformat As described in Knowledge Base article #306504: "After creating a Windows partition in Boot Camp 2.0 in Mac OS X 10.5, then rebooting from the Windows XP installer CD, be sure that you format the Windows partition before continuing with the rest of the Windows XP setup process. Important: Do not use the option named "Leave the current file system intact (no changes)." In other words, for instance: use Boot Camp to partition the drive as FAT32, then follow the instructions to begin the Windows XP install, and when prompted, reformat the partition with the utility as FAT (FAT32).
  • Update EFI In some cases, however, users are not being prompted to reformat. The problem may be out-of-date EFI. Make sure that you have the latest revision for your system, available from Apple's download page (search for EFI).
  • Modify Windows XP CD As described by Apple Discussions poster Talez: check to see if there is a file named "winnt.sif" inside the I386 folder on the Windows XP CD. If it exists, follow these instructions to rebuild the Windows XP CD. Talez says "Skip steps 2 and 3 (since you already have SP2 built in) and remove the 'winnt.si' file from the I386 folder before going on to step 4."
Powered By:Maxfit.com

How to dual-boot Vista with XP - step-by-step guide

Scenario: You want to install Vista on your PC alongside your XP installation, on the same drive. You have already installed XP. (If you installed Vista first, see our other tutorial on How to dual-boot Vista and XP - with Vista installed first.)

Tutorial Summary: We're going to use the DISKPART utility on the Vista DVD to shrink the Windows XP partition on the hard disk and create enough space for an installation of Vista. We'll then install Vista and use the EasyBCD utility to modify Vista's bootloader to get XP loading properly.

This is an updated tutorial,based on our first Windows XP/Vista dual-booting workshop. The main difference is that we're covering using both the latest version of GParted and DISKPART to shrink the Windows XP partition.

DISKPART can shrink NTFS partitions and it's certainly the more convenient option, but on some systems using DISKPART to shrink the volume will fail, with an vague "Access is denied" error.

This may have something to do with different disk controllers, as this was a problem on the AcerPower test system which has a SATA hard drive, but not on the VMWare system which uses a virtual IDE controller. So we'll cover both processes

EasyBCD has also been updated since the first tutorial was written.

This tutorial was tested on a VMWare Workstation 6 virtual machine and an AcerPower SK50.

Get Started - Using GParted

We assume that before you start this tutorial, you have backed up the drive (partitions and data) that will host the two operating systems.

Your first step will be to modify the Windows XP system partition to make space for Vista using GParted

The GParted Live CD ISO is available here – burn it to CD and boot the system from the disc. The version we used was 0.3.4-7.

Boot the Linux machine from the GParted LiveCD. Depending on your system, you should just need to select the auto-configuration boot option.

Ubuntu & Vista - GParted


During boot, press Enter twice when prompted to select the keymap and language settings.

When the main GUI loads, right-click on the main Windows XP NTFS partition (depending on your setup, probably /dev/hda1) and select Resize/Move.

XP & Vista - Resize Partition


Use the slider to reduce the partition size and free up enough room to instal Vista (at least 10GB) and click Resize/Move.

XP & Vista - Resize Partition 2

The changes haven’t actually been made, they’ve just been scheduled to run. To commit the changes and resize the partition, click Apply. GParted will ask to confirm the changes – hit OK and away you go.

Get Started - Using DISKPART

Boot the machine from the Vista DVD. Select the appropriate language and then "Install Now".

XP & Vista - Load Vista

On the produt key page, press SHIFT + F10 to launch a Windows PE 2.0 command window. Then type in DISKPART and press enter to get into the DISKPART utility.

XP & Vista - DISKPART

Now type in LIST VOLUME - this gives you a readout of the volumes available on the system. Select the main Windows XP volume (probably Volume 0) by typing in SELECT VOLUME 0.

XP & Vista - DISKPART Volume

Now type in SHRINK. Vista will reduce the size of Volume 0 (the selected Volume) by around 50%.

XP & Vista - DISKPART Shrink

Once that is done, type in EXIT and EXIT again to get back to the Vista installation window.

Now Install Vista

If you used the GParted LiveCD to shrink the XP partition, you'll need to reboot the system from the Vista install DVD. If you've used DISKPART then you just need to continue the installation.
Once the install gets to the install location, there should be at least two options: a partition marked as Primary and unallocated space. Select the unallocated space and click Next. The install will then commence.
XP & Vista - Install Vista

The Vista boot manager will take over the system completely, and Windows XP effectively loads via Vista. It’s all pretty seamless though, and you shouldn’t encounter any technical problems.

Modify Vista's Bootloader

Once Vista is installed and the system reboots, you’ll be presented with a boot menu with two options: “Microsoft Windows Vista” and “An Earlier Version of Windows”.

XP & Vista - Boot Menu

This is perhaps a little bit bland, so you’ll probably want to change it. Here’s where one of the new features of Vista comes in, and it’s not so terrific. In Windows XP if you want to modify the bootloader, just right-click on My Computer, select Properties, go to the Advanced Tab, and click Settings under Startup and Recovery, then click Edit. This opens a local file – boot.ini. It’s just a standard text file and you can change pretty much anything. Unfortunately it’s not that easy in Vista – you can still navigate to the Startup and Recovery settings, but all you can do is select which operating system is the default and modify the timeout settings.

To edit Vista’s boot manager you have to use the command line BCDEDIT utility. To access BCDEDIT, run the Command Window as an administrator and type in BCDEDIT.

Unfortunately BCDEDIT isn’t an easy tool to come to terms with, especially as it’s purely command line-driven. So, a great tool to use here is EasyBCD by NeoSmart Technologies. EasyBCD offers a GUI frontend to BCDEDIT, and makes life much easier.

Once Vista is installed, call up the browser and navigate to the EasyBCD download page - download, install and launch the application.

To configure the bootloader go to “Configure Boot” – you’ll see the two entries, for XP and Vista. To change the name of Windows XP, just overwrite “Earlier Version of Windows” with “Windows XP” and click Save Settings.

XP & Vista - Modify Boot

Reboot the system and the changes are visible. You have a dual-booting Vista and XP system. That's all there is to it.

XP & Vista - Changed Boot

Open up Windows Explorer and there’s two hard drives – the primary disk running Vista and the secondary disk with XP installed. Restart the system and load up Windows XP, and the XP disk is now the primary, with the Vista partition running on the secondary D: drive

If you decide that dual-booting Vista and XP is not for you, EasyBCD lets you wind back the clock.

All you have to do is remove Vista’s boot manager – go to “Manage Bootloader”, select “Uninstall the Vista Bootloader” and then “Write MBR”. Restart the machine and that’s it – the XP boot loader is the only one left on the system and XP loads. You can then delete the Vista partition and use GParted to re-extend the partition to take up the entire disk, or the Extend command in Vista DISKPART.(source:http://apcmag.com)

Windows XP on my Mac using Boot Camp

How do I install Windows XP on my Mac using Boot Camp?

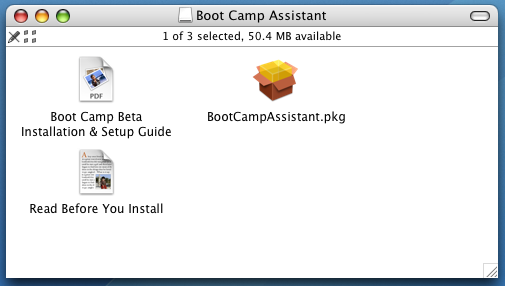
Now, download Boot Camp from the Apple site and double click on the ".dmg" disk image that's dropped onto your desktop. Here's what you'll see:

Apple Boot Camp Windows XP Dual Boot Installer: Finder Folder View

Your first step, as highlighted in the "Read Before You Install" document, is to print a copy of the Boot Camp Beta Installation & Setup Guide. Trust me, you'll want it!

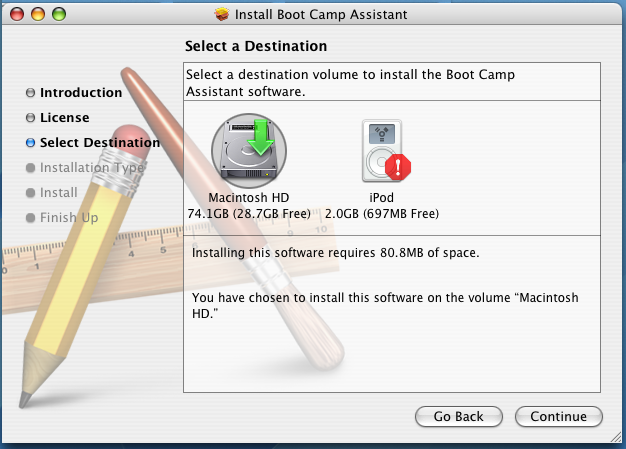
Double-click on the "BootCampAssistant.pkg" icon and you'll be able to install the Boot Camp assistant:

Apple Boot Camp Windows XP Dual Boot Installer: Installing the Assistant

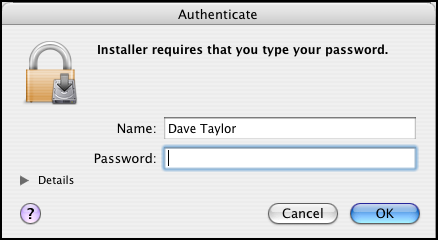
As with all Mac software installs, this will require you to type in your administrative password. It's probably the same as your default account password:

Apple Boot Camp Windows XP Dual Boot Installer: Authenticate

A few seconds of activity later, you'll have the software successfully copied onto your computer and can quit this first installer.

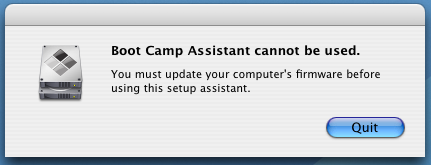
Now your first challenge: finding the new installation assistant! It turns out that the program is installed on your computer in Applications --> Utilities --> Boot Camp Assistant. Launch it and it's quite possible you'll see the same message I did:

Apple Boot Camp Windows XP Dual Boot Installer: Update Firmware

No huge problem. Quit by clicking the "Quit" button, then go to Apple's Support Downloads and check their Available Firmware Updates list to click directly to the firmware update for your own Intel system. For my Mini, I simply go back to the downloads page and scan down for the name of my system.

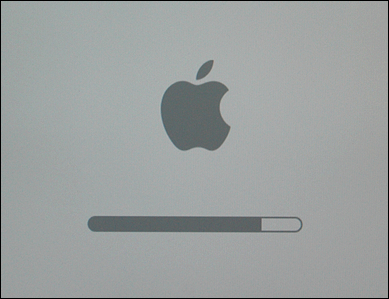
Once the correct firmware update is installed, you need to reboot, but not in the usual fashion. Instead, press and hold the power button on the Mini itself -- it takes about ten seconds -- until the power indicator light flashes repeatedly to begin the update. Your system will boot and you'll see the Apple icon and a progress bar:

Apple Boot Camp Windows XP Dual Boot Installer: Supplemental Photos

That will advance, it took me about 90 seconds total, and you'll reboot again, ready to go!

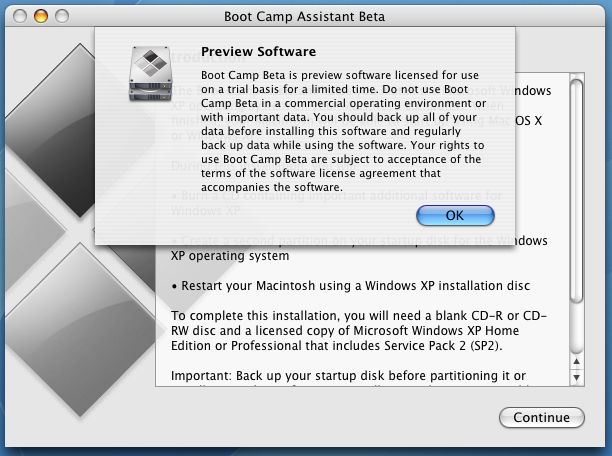
Finally, we're ready to actually start working with Boot Camp itself. The first step is to read all of Apple's warnings:

Apple Boot Camp Windows XP Dual Boot Installer: Warnings and Welcomes

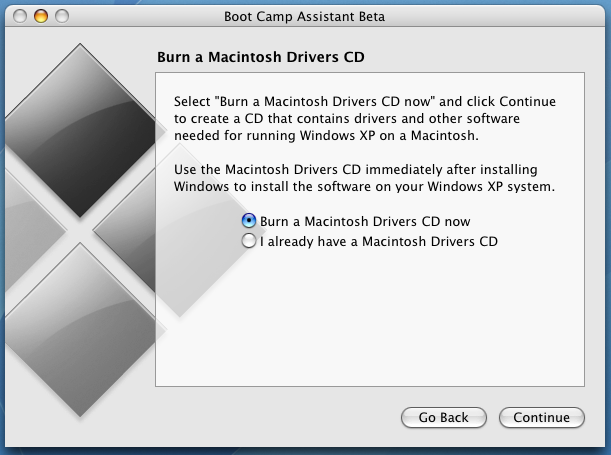
Okay, now let's proceed. First choice: do we want to burn a Macintosh Drivers CD, which contains important device drivers for Windows XP so it can access the various hardware parts of the Mac, or do we already have one. I don't already have one, so I'll choose the default of "Burn a Macintosh Drivers CD now":

Apple Boot Camp Windows XP Dual Boot Installer: Burn Windows Drivers CDROM

I slip in the blank disk and the system tells me it's "ready to burn". Click "Burn" and it'll do everything necessary to create the Windows XP drivers CD. This took a few minutes on my Mini, but it wasn't terribly long.

Next step is much more exciting: it's time to partition the hard disk!

Partitioning is a geeky buzzword for something that will actually make a lot of sense to you, believe it or not. The idea is that if you have a large hard disk, why not configure it to act like two small hard disks? Or three? In this way, smart system administrators can isolate accounts, minimize out-of-disk-space errors and disruptions, and so on. With Apple Boot Camp, we'll want to partition the default disk to allow us to have one "disk" that represents the Windows XP world, and another "disk" that represents Mac OS X.

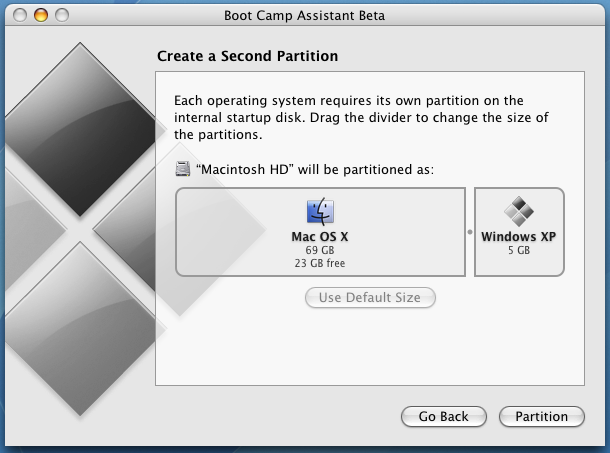
By default, Boot Camp offers up a pretty tiny partition for Windows, as you can see:

Apple Boot Camp Windows XP Dual Boot Installer: Create Second Partition

I'd recommend that you make it bigger if you're actually going to use Windows for anything important; Microsoft recommends 10GB as the smallest reasonable and functional partition, for example. If you're just playing, however, 5GB will probably work fine (until your first big game install). I'll make mine 8GB to be somewhere in the middle.

Change the partition sizes by clicking and dragging on the vertical bar between the two areas until you have the size or sizes you desire. With my Mini configuration, it left me with 66GB for Mac OS X, of which 20GB is free, and 8GB for Windows XP.

Once the partitions are set up as you desire, click on "Partition" and keep your fingers crossed (there is a slight chance it'll actually mangle everything on the disk. Not likely, but I would definitely recommend you do one good, clean backup before you start experimenting with Boot Camp).

The disk partition is what we Windows folk call non-destructive or dynamic, which means that you don't have to reformat and then reinstall everything on both "sides" of the partition. That's a very, very good thing. :-)

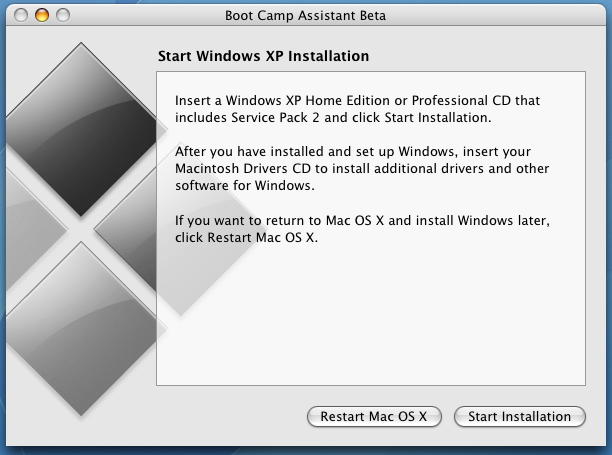
Once the partitioning is done, you're ready to install Windows itself:

Apple Boot Camp Windows XP Dual Boot Installer: Ready to Start WinXP Install

Fortunately, I have a pristine new copy of Microsoft Windows XP Pro with SP2 included for PCs without Windows (who would have thought I'd think of my Mac as a PC without Windows?) and that's what I'll use. My thanks to Microsoft for sending it along...

Insert the WinXP installation DVD, wait for it to be recognized by Mac OS X (it'll show up on your desktop with a cheery name like "VRMFPP_EN"), click on "Start Installation" and kiss Mac OS X goodbye.

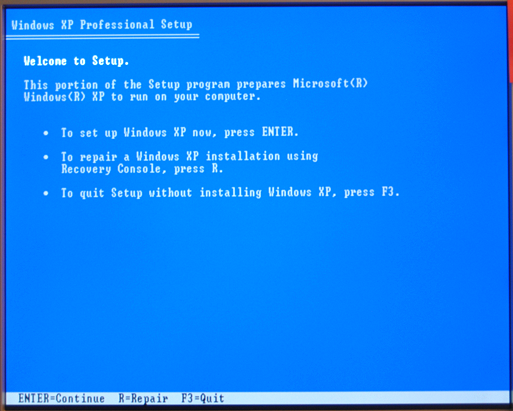
After a bit, you'll see the unfamiliar blue screen of a Windows installation:

Apple Boot Camp Windows XP Dual Boot Installer: Supplemental Photos

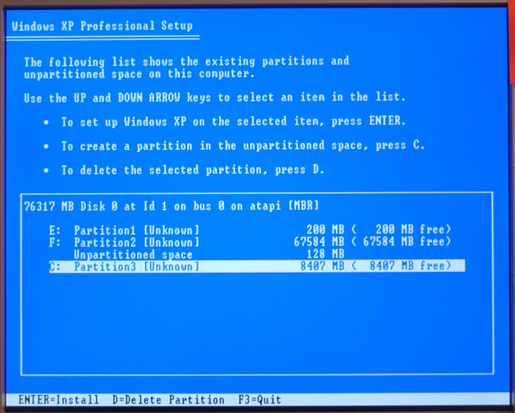
Press ENTER or Return on the keyboard to continue, agree to the Microsoft warnings and legal restrictions page, and you'll finally get to the "choose partition" list:

Apple Boot Camp Windows XP Dual Boot Installer: Supplemental Photos

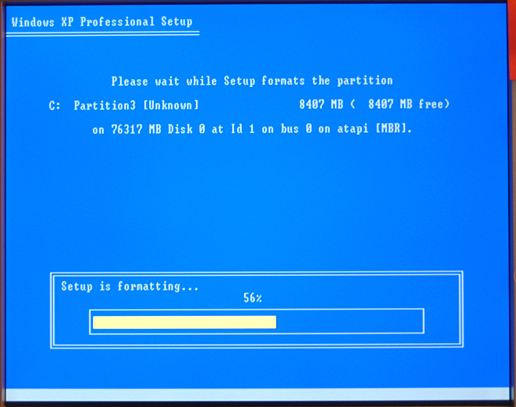
Take your time here to ensure that you pick the correct partition! You want to use Partition C: which should match the size you just set too: notice on my screen it's 8407MB, which is about 8GB, as expected. Move the highlight bar down to the correct partition and press Enter to actually install WinXP.

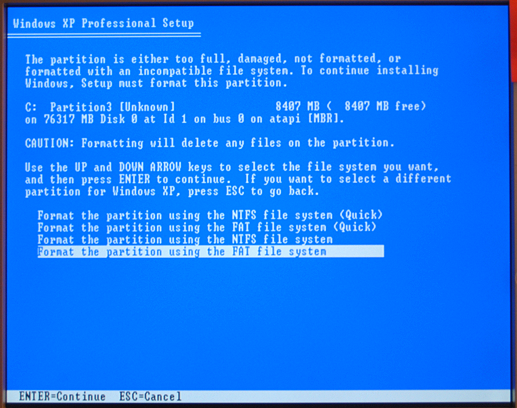
Now you need to pick a partition formatting option. The two main choices are NTFS or FAT. NTFS is more modern and supports very large partitions, but can't interoperate with Mac OS X. FAT, on the other hand, can't support partitions larger than 32GB, but is compatible with the Mac. You'll see why that's important later. For now, select FAT and do a full, not a quick, format:

Apple Boot Camp Windows XP Dual Boot Installer: Supplemental Photos

Now some time will pass while the partition is formatted using the Windows FAT32 format. It took my system about five minutes to fill in the progress bar:

Apple Boot Camp Windows XP Dual Boot Installer: Supplemental Photos

I won't document every single step involved in installing Windows XP as it's pretty straightforward. Just make sure you have your product key available for the verification step of the process. It's in the package within the Microsoft Windows XP disk, and it's really a good idea to use a new version of the OS rather than the same key you've used with other PCs in your office or home. Worst case, you can skip the verification step and have 30 days of "trial period" before you have to deal with finding a valid key to enter for verification purposes.

Once you've finished the full Windows XP install, which can take rather quite a while, your system will reboot and you'll want to eject the WinXP install disk and slip in the Mac drivers CD you burned earlier in the process.

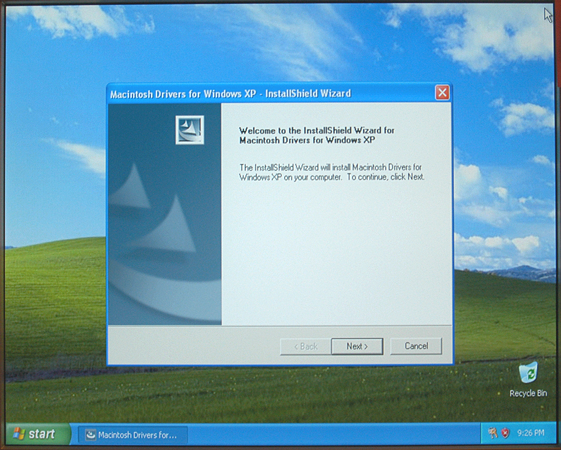
With Windows, this is done by going to My Computer and right-clicking on the optical drive D: then selecting Eject. Slip in the Mac disk and everything should just automatically launch and start up. If not, look for and double click on the file Install Macintosh Drivers for Win XP.exe. Here's what you'll see:

Apple Boot Camp Windows XP Dual Boot Installer: Supplemental Photos

I admit, it's kind of weird to see a Mac installation program running within Windows XP on a Mac computer, but it's a brave new world out there.

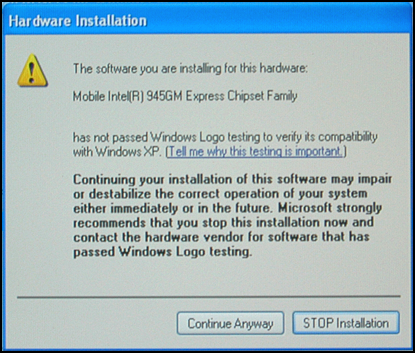
Probably, during the installation process, you'll learn that various components of your Intel-based Macintosh haven't passed the Microsoft Windows compatibility test:

Apple Boot Camp Windows XP Dual Boot Installer: Supplemental Photos

Apple assures us that it's safe to continue anyway, so I did. Three times!

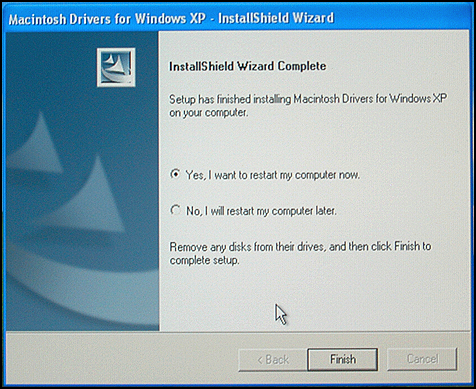
Then you get to go through a few waves of "new hardware found", and in all cases you can simply accept all the default settings for each wizard, as those guys in Redmond call 'em, and proceed. Finally, you'll get to the last configuration screen:

Apple Boot Camp Windows XP Dual Boot Installer: Supplemental Photos

Click "reboot now" and if the hardware compatibility Gods are smiling upon you, the Mac will reboot right into Windows and you'll be the proud owner of a Macintosh that can run Windows natively, astonishingly enough.

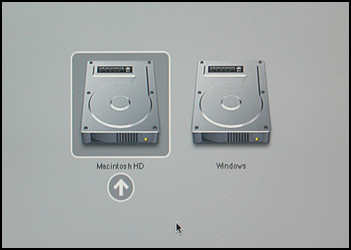
One last tip: to select which OS you want to run, hold down the OPTION key when you start up the Mac and you'll be able to see both Mac OS X and Windows XP:

Apple Boot Camp Windows XP Dual Boot Installer: Supplemental Photos

Use the arrow keys to move to the choice you desire, then press Enter or RETURN to select it and zoom into that mode.

When you do boot into Mac OS X, you'll notice that there's a new hard disk on your desktop too, called "NO NAME". Click on the name, count to five, and click again, then type "Windows XP" and you'll forevermore realize what it is. And yes, you can navigate through it and find your data files from when you're running Windows, but I'll talk about that in another article!

It's a long, tricky process, but I hope this explains exactly how to install and get running with Apple Boot Camp. Also, don't miss my tutorial on how to install Parallels to run Windows XP within Mac OS X, rather than having to reboot each time you want to switch systems. (Source:http://www.askdavetaylor.com)

How to dual boot Vista and XP (with Vista installed first) -- the step-by-step guide

Scenario: You want to install Vista on your PC alongside your XP installation, on the same drive. You have installed Vista already. (If you have XP installed first, check out our earlier tutorial on how to dual boot Vista and XP with XP installed first.)

Tutorial Summary: We're going to use the DISKPART on the Vista DVD to shrink the Vista partition on the hard disk and create enough space for an installation of Vista. We'll then install XP, repair the Vista bootloader which will be overwritten during the XP installation, and then use the EasyBCD utility to configure Vista's bootloader to boot the XP partition.

This is an updated tutorial, based on our first Windows Vista/XP dual-booting workshop. The main difference is that EasyBCD has been updated, but the processes are essentially unchanged.

This tutorial was tested on a VMWare 6 Workstation and an AcerPower SK50 system.

Prepare Windows Vista

This tutorial assumes that Vista has been installed on a partition which takes up 100% of the hard drive, so we need to create some space. Boot off the Vista DVD. Hit Next from the start screen and then select “Install now”. (If Vista came preinstalled on your machine and you don't have a Vista install DVD, you can use the Gnome Partition Editor Gparted to do it. Our earlier tutorial on dual-booting XP and Vista if you've installed XP first describes how to use it.)

Install Vista

Install Vista

Don’t type in your product key and untick “Automatically activate Windows when I’m online”, then hit “Next”, and “No” when asked whether you want to enter the key.

Vista Product Key


Vista Product Key

When prompted to choose the edition of Vista you’re installing you can actually select any of them as we’re not doing a Vista install at this point. Also tick “I have selected the edition of Windows that I purchased” and hit “Next”.

Vista Version


Vista Version

Accept the license terms and hit “Next” again, then choose a Custom installation.

On the screen where you’re asked where you want to install Windows, you should see a single large partition marked Primary – this is where Vista is already installed.

Vista Partition


Vista Partition

Press SHIFT + F10. This is a Windows PE 2.0 shortcut to open up a command window – very useful trick.

Command Tool


Command Tool

Type in DISKPART and press Enter. This opens the Microsoft DiskPart application. You need to select the active disk, so type in:

list disk

The primary disk is generally Disk 0, so type in:

select disk 0

DISKPART Disk


DISKPART Disk

Now we need a list of volumes on this disk, so type in:

list volume

In this case Volume 0 is the one we want, so type in:

select volume 0

DISKPART Volume


DISKPART Volume

Now type in:

shrink

DISKPART Shrink


DISKPART Shrink

DiskPart will go off and reclaim as much of the drive as it can – you should get at least 50% of the space back.

Now type

EXIT

and

EXIT (again)

to quit the command window and get back to the install screen. Click Refresh and the partition window will update – you should now see the original Primary partition plus a brand new partition.

New Partitions


This is where we will install Windows XP. Eject the DVD, restart the machine (just hit the reset button) and boot off the Windows XP CD.

Now, install Windows XP

When the Windows XP setup reaches the point where you’re prompted where it is to be installed, you’ll see that while XP can see the space we created earlier, it can also see the partition with Vista on it.

XP Partition


XP Partition

You should be able to see the space you reclaimed on the disk earlier which has become "unallocated space".

Create a second partition using the Windows XP installer screen above by selecting the free space on the drive and pressing "C" to create a partition (if prompted, choose NTFS as the file system.)

Irritatingly, XP assigns a drive letter to this partition (C:) which means that it will use the next available drive letter after all the other physical drives have been taken into account.

This means that the system drive of the XP installation won’t be C:.

From XP’s perspective this isn’t really a problem – it’s smart enough to figure out where everything should go – but some applications make assumptions about where they should install to, and can’t cope with a non-standard Windows configuration.

This was also the case with our tutorial on dualbooting Ubuntu and XP, where Ubuntu had been installed first. However in that scenario, even though the XP system drive had a non-standard drive letter, it couldn’t read the Linux partitions so there was no danger of the two systems overlapping. This is not the case with Vista/XP.

Nonetheless, install XP as normal – there’s no need to do anything differently.

IMPORTANT NOTEafter the initial file copy, Windows XP reboots and loads up the GUI-based component of the install. You may get the following error: “A disk read error occurred – press Ctrl-Alt-Del to continue”. This is caused by a corrupt bootloader – click here to see how to fix this problem.

When the system reboots it won’t bring up a boot menu. Although XP recognises the Vista partition it doesn’t recognise Vista itself.

The Windows XP bootloader gets installed to the MBR and Vista can no longer boot.

When XP loads, open up Windows Explorer and you’ll see something interesting – a C: and (in this case) an E: drive.

The C: drive contains Windows Vista, and as Windows XP can read NTFS partitions, it can browse and modify Vista’s file structure.

More importantly, applications which have installation paths hard-coded into their install scripts rather than using Windows system parameter variables could easily dump files into C: when they should be installing to E:. This isn’t such a great situation.

Two Drives

Two Drives

Restoring Vista and dual booting

Because you can’t use the Windows XP bootloader to boot Vista, we have to reinstate Vista’s bootloader to the MBR and configure it to manage both operating systems.

Compared with scenarios involving Ubuntu where you have to reinstall the GRUB bootloader, getting Vista up and operational again is very easy.

Boot from the Vista DVD and on the screen where you’re prompted to “Install now”, select “Repair your computer”.

Repair Vista

Repair Vista

The next screen searches for local Vista installations – there should only be one, so click Next.

Choose Vista

Choose Vista

This loads the System Recovery Options screen. Select the first option – Startup Repair. This looks for problems which would prevent Vista from loading (like a missing bootloader) and automatically fixes them.

Startup Repair

Startup Repair

If you click on “Click here for diagnostic and repair details” and scroll to the bottom of the list, it shows that the problem detected and repaired was a corrupt boot sector (according to Vista, anyway).

Repair Diagnostics

Repair Diagnostics

Click Close and then Finish, and the system will restart and boot into Vista.

Now we need to enable dualbooting with XP, and EasyBCD is the best application to achieve this.

Download and install EasyBCD.

Launch the app and go to Add/Remove Entries.

Under “Add an Entry” and under the Windows tab and select in the Version drop-down list “Windows NT/2k/XP/2k3”.

Change the Drive to E:\ and the name to “Windows XP”, then click “Add Entry” and “Save”.

Vista & XP - EasyBCD

Vista & XP - EasyBCD


Reboot the system and you’ll have two entries in the Vista bootloader, and can boot into either operating system.

Vista Bootloader

Vista Bootloader

Removing Windows XP

If you eventually decide that dualbooting XP as the second OS isn’t all it’s cracked up to be, it’s pretty easy to undo the changes made.

Use EasyBCD to remove the Windows XP boot entry, and then go into Computer Management (right-click on Computer, Manage) and go to Disk Management.

Right-click E: drive (the Windows XP partition) and select Delete Volume.

Right-click the newly-created partition and select Delete Partition.

Then right-click the C: drive (the Vista system partition) and click Extend Volume – this opens up the Extend Volume Wizard.

Extend Volume Wizard

Extend Volume Wizard

The wizard gives you a readout on how much space is actually available to extend the partition – enter in how much you want to use and press Next. Vista will extend the system partition to reclaim the disk and Windows is well and truly gone.

Fixing the corrupt bootloader

If the Windows XP bootload corrupts during the install, performing a reinstall won’t fix it, nor will going into the XP Recovery Mode and attempting to repair the MBR.

Luckily, the install was up to the stage where all you need to do is be able to boot from the Windows XP partition, and the install will pick up from where it left off.

To achieve this, follow the procedure outlined above to restore the Vista bootloader (under "Restoring Vista and Dualbooting").

This allows the system to boot into Vista, and then you can use EasyBCD to create an XP boot entry and boot into that to continue on with XP's installation. (For details on using EasyBCD, also see the section "Restoring Vista and Dualbooting".)

Tuesday, March 25, 2008

F-Prot Antivirus Pro 6.0


F-Prot is a quick and easy to use antivirus software package, specially designed to protect your data from virus infection and to remove any virus that may have infected your computer system. Running on all Windows versions, this security software package has various components that help keep your system secure from viruses, backdoors, trojans and other malicious programs.
F-Prot includes the RealTime Protector, a memory-resident monitoring utility that observes all files accessed on your system, a Scheduler where you can set the Scanner to make automatic scans or updates on your system at any time and an Updater to manage all signature updates. In addition, the program's innovative and integrated heuristic detection capabilities provide the best possible protection against unknown future threats that may emerge.
FRISK Software's antivirus experts maintain an active vigil around the clock to catch new threats in their infancy and to provide our customers with new virus signature files as soon as possible. The virus signature files are updated every few days and whenever necessary.

Version 6 of Home edition is a new, significantly enhanced version that incorporates many changes and improvements, including new user interface, enhanced features such as automatic e-mail protection, automatic ActiveX protection, fully automated software upgrades and virus signature file updates, exclusion lists, backup system, a quarantine and improved automatic file system protection. In addition to these very significant improvements, version 6 of F-PROT Antivirus for Windows home edition has maintained its competitive advantage as a reliable and easy-to-use antivirus product that consumes an absolute minimum of system resources.
F-PROT Antivirus for Windows Home offers fully automatic virus signature file updates and software upgrades through the Internet and the proxy server.

When you install F-PROT Antivirus, your computer is protected against viruses, worms, Trojan horses and other malicious programs round the clock. Version 6 of F-PROT Antivirus features automatic real-time protection to all files including archives, code downloads and e-mail attachments. If infected files found, F-PROT Antivirus will automatically disinfects or quarantines them automatically.

Despite its improved detection and redesigned and simplified user interface, below are the key features of version 6 of F-PROT Antivirus:
- Advanced heuristics-based detection defends against new and unknown threats.
- Automatic file system protection that provides automatic real-time protection to all files, ActiveX controls and e-mail attachments, whenever they are accessed, created or copied on your computer.
- Fully automated updating of virus signature file and software upgrading.
- Automatic disinfection of viruses, worms and Trojans without damaging files.
- Quarantine for isolation of infected/suspicious files.
- Backup system that is easily accessible by system administrators.
- Exclusion of files, folders and extensions for automatic and manual scan.
- Scheduling tasks to scan for viruses at a specified time and date.
- Password protection to prevent unauthorized modification of your settings.
- Automatic ActiveX protection that provides automatic real-time protection to all malicious ActiveX controls via Internet Explorer 5 and newer. Other browsers are supported via the automatic file system protection.
- Automatic e-mail protection that provides automatic real-time protection to all e-mail attachments via Microsoft Outlook 2000 and newer. Other e-mail programs are supported via the automatic file system protection.
- Production of detailed logs and scan reports.
- A powerful F-PROT Antivirus Command-Line Scanner for advanced users.

Features:
- Real-time scanners
- Scans e-mail attachments
- Automatic ActiveX protection
- Automatic virus signature files updating and software upgrading
- Updating through Internet
- Updating through local network
- Updating through proxy
- Quarantine files
- Password protection
- Command-line scanner
- Automatic virus removal
- Backup files
- Heuristic detection engine
- Exclusions
- Scheduled updates
- Ondemand scan
- Scans compressed files
- Program status monitoring
- Scheduled scan