Friday, July 25, 2008

Intel New System On A Chip Designs

Gadi Singer, Vice President of Intel’s Mobility Group, and Doug Davis, Vice President of Intel’s Digital Enterprise Group, held a conference call today to discuss a brand new product line from Intel targeted at security, storage, communications, and industrial applications, the Intel EP80579 Integrated Processor family.

Although the Intel EP80579 branding will be new to most of you, the underlying technology is comprised of products that have a well established history at Intel. In fact, this line of products is based on the Pentium M processor core, as it has been in development for quite some time now. The Intel EP80579 Integrated Processor family, however, is more than just a new processor. The products actually consist of new System on a Chip designs that integrate a Pentium M core, with a Memory Controller Hub (MCH), I/O hub (ICH), and in some cases specialized security, TDM (Time Division Multiplexing for voice-over-IP apps), and data path acceleration engines, which have been dubbed Intel QuickAssist Technology.

Development was started on the Intel EP80579 Integrated Processor family to prepare the company for the impending onslaught of smart, Internet-connected devices and appliances predicted to arrive over the next few years. The Intel EP80579 product line puts Intel in a position to target several growth areas across Consumer Electronics (CE), Mobile Internet Devices (MIDs) and other embedded markets. "We’re now able to deliver more highly integrated products ranging from industrial robotics and in-car infotainment systems to set-top boxes, MIDs and other devices. By designing more complex systems onto smaller chips, Intel will scale the performance, functionality and software compatibility of IA while controlling the overall power, cost and size requirements to better meet respective market needs,” said Gadi Singer.


In addition to lower-power characteristics and the smaller form factors enabled by the Intel EP80579's integrated design (in some cases, Intel claims they will lead to platforms that have a 45% smaller board footprint and 34% lower power dissipation), the main benefit of this product line is its native support of Intel Architecture (IA), aka x86. As we stated in our initial coverage of Intel's Atom processor, manufactures of today's smart phones, set top boxes, and MIDs, and software developers, must contend with incompatibilities between the many different platforms being used today. Should these devices all use IA, however, developing software for them would be much easier and application compatibility could be maintained across multiple devices. The slides above illustrate much of what we have outlined here and further explain Intel's strategy and direction.


The individual components within the Intel EP80579 SoCs communicate over an internal Front Side Bus that connects the Processor Core, MCH, and ICH. And Intel has also developed a high performance bus to connect the security, TDM, and data path acceleration engines to the I/O Complex. Please note, that only four of the initial eight products being announced today feature the Acceleration Services Unit and TDM interface represented in the block diagram above. Those features are what make up the Intel QuickAssist Technology, which isn't featured on every Intel EP80579 SoC.


Intel EP80579 Integrated Processor with Intel QuickAssist Technology*

Model

Core Speed

DDR2 (MHz)

Temperatures

L2 Cache

TDP

NU80579EB600C

600MHz

400/533/667

Commercial 0-70°C

256KB

13W

NU80579ED004C

1.066GHz

400/533/667/800

Industrial -40-85°C

256KB

20W

NU80579ED004CT

1.066GHz

400/533/667/800

Commercial 0-70°C

256KB

20W

NU80579ED009C

1.2GHz

400/533/667/800

Commercial 0-70°C

256KB

21W

* Includes security, TDM, and data path acceleration


Intel EP80579 Integrated Processor for Embedded Computing

Model

Core Speed

DDR2 (MHz)

Temperatures

L2 Cache

TDP

NU80579EZ600C

600MHz

400/533/667

Commercial 0-70°C

256KB

11.5W

NU80579EZ600CT

600MHz

400/533/667

Industrial -40-85°C

256KB

11.5W

NU80579EZ004C

1.066GHz

400/533/667/800

Commercial 0-70°C

256KB

18W

NU80579EZ009C

1.2GHz

400/533/667/800

Commercial 0-70°C

256KB

19W


The eight individual products that will initially make up the Intel EP80579 Integrated Processor family are listed in the charts above. As you can see the products will be offered in a range of speeds, power dissipation, and commercial / industrial temperature options.

In addition to the products Intel spoke about today, the company also disclosed that they have more than 15 SoC projects currently planned internally--many of which are built around the Atom core-- including the company’s first Consumer Electronics (CE) chip codenamed “Canmore”, which is scheduled for introduction later this year, and the second-generation “Sodaville” which should hit sometime in 2009. As we've mentioned in previous articles, Intel’s second-generation embedded product line is slated to arrive in 2009 as well, with the company's next-gen platform for Mobile Internet Devices code-named “Moorestown”.

Regardless of all of the codenames and announcements though, what all of this means to consumers is that Intel is obviously focused on securing design wins in virtually any type of device that connects to the Internet or runs software and we may not be too far off from pocket-sized MIDs that can run off the shelf OSes and applications, just like our desktop PCs.

Source: www.hothardware.com

Wednesday, July 23, 2008

How To Reset Linux Forgotten Root Password

1.0 Introduction

Suppose you have just taken over as a new system administrator from another person just before they left and they forgot to give you the root password. Now, let's say you have to install the latest version of PHP on the system so that the sales department's website works the way its supposed to. You have to get the website up yesterday, since you are losing money every minute it doesn't work. Or maybe you simply need to add another user to the system.

The above scenarios are just two possible cases when you might need to reset the root password on a system; there are hundreds of other possible cases when you might need to do this, but I am not going to list all of them. Most of us know what to do when something like this happens on a Windows machine, but not a lot of us know how to recover lost passwords from Linux machines. This document attempts to rectify this situation by telling you about the different options available to recover passwords from YOUR machines. (Don't use this to break into other people's systems as that would be stupid and will get you into big trouble if you are caught.)

1.1 Disclaimer

Use the information in this document at your own risk. I disavow any potential liability for the contents of this document. Use of the concepts, examples, and/or other content of this document is entirely at your own risk.

The information in this document should only be used to recover passwords from machines to which you have legal access. If you use this information to break into other people's systems, then I am not responsible for it and you deserve your fate when you are caught. So don't blame me.

You are strongly advised to make a backup of your system before performing any of the actions listed in this document.

1.2 Credits

In this version, I have the pleasure of acknowledging the following people without whose input this would have never seen the light of the day:

  • The community at http://www.justlinux.com, for the really helpful debate about this topic in one of their threads.
  • The creators and maintainers of the various Linux documentation sites using which I gathered this information.
  • Matt Hoskins and Kevin Walsh, for getting me interested in Linux in the first place.
  • My friends and family, for bearing with me when I was compiling this document.

1.3 Before you start

Before you attempt to change or replace the password of any machine, make sure you get permission from the management authorizing it, 'cause otherwise it can be mistaken as an attempt to hack into the machine, which is not good.

Secondly, create a backup of all important data before you do anything else, so if anything goes wrong you'll still have a copy of your data. If you didn't, and something went wrong, don't blame me. I tested most of this stuff on my system and it worked, but you are responsible for your system, not me, so don't blame me if something did go wrong.

2.1 Various Options available

There are various methods available for resetting a root password. In this section, I will list all the major ones, and we will go over each in detail later in the document. I will also go over some steps to prevent some other person from doing this and hacking your machine.

The various methods are:

  • Boot into single-user mode (easiest, least risky)
  • Boot using a boot disk and edit the password file
  • Mount the drive on another computer and edit the password file

2.1.1 Reseting passwords by booting into single-user mode

This is the easiest and the fastest method to reset passwords. The steps are a little different depending on if you are using GRUB or LILO as a bootmanager.

Booting into single-user mode from LILO

Follow these steps to reset the password when using LILO:

  • Reboot the system. When you see the LILO: prompt (see Fig. 1 below), type in linux singlelinux init=/bin/bash instead. and press 'Enter'. This will log you in as root in single-user mode. If your system requires you to enter your root password to log in, then try
  • Once the system finishes booting, you will be logged in as root in single-user mode. Use passwd and choose a new password for root.
  • Type reboot to reboot the system and then you can login with the new password you just selected.
Lilo Boot Menu
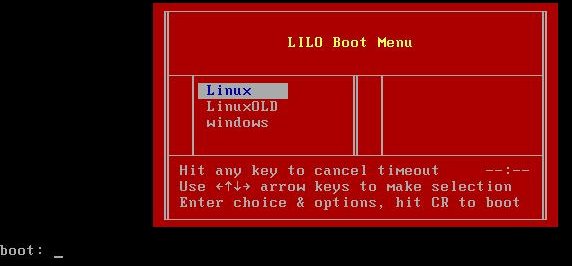
Figure 1. Lilo Boot Menu

If you have a new version of LILO which gives you a menu selection of the various kernels available press Tab to get the LILO: prompt and then proceed as shown above.

Booting into single user mode from GRUB

Follow these steps to reset the password when using GRUB:

  • Reboot the system, and when you are at the selection prompt (See Fig. 2 below), highlight the line for Linux and press 'e'. You may only have 2 seconds to do this, so be quick.
  • This will take you to another screen where you should select the entry that begins with 'kernel' and press 'e' again.
  • Append ' single' to the end of that line (without the quotes). Make sure that there is a space between what's there and 'single'. If your system requires you to enter your root password to log into single-user mode, then append init=/bin/bash after 'single'. Hit 'Enter' to save the changes.
  • Press 'b' to boot into Single User Mode.
  • Once the system finishes booting, you will be logged in as root. Use passwd and choose a new password for root.
  • Type reboot to reboot the system, and you can login with the new password you just selected.
GRUB boot screen
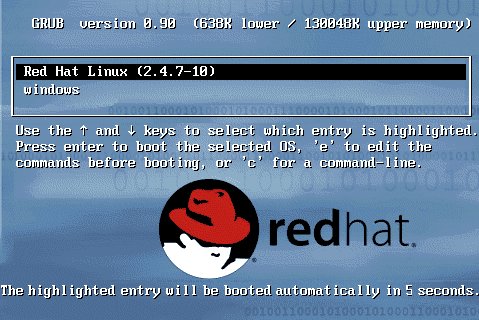
Fig. 2: GRUB Boot Screen

2.1.2 Reseting passwords by using a boot disk and editing the password file

This method is a little bit more complicated than the previous one and has a very high chance of success (assuming your filesystem is not encrypted and you didn't forget the password to decrypt it if it is). As before, get permission before you do this.

To start, you need a Linux boot disk or a rescue disk. (If you didn't create one when prompted during the installation then let this be a lesson for you.) You can use your installation CD as a rescue disk; most distros have an option to allow you to boot into rescue mode. With my Redhat Linux CD, I have to enter linux rescue to start the rescue mode. But this might be a bit different in each distro. You can also use a live linux CD like Knoppix or Gnoppix for system recovery. (Click here for a list of all the live Linux CD's). In this tutorial I will use Knoppix as my rescue CD but the process is almost the same for any rescue CD you might use.

[ You can also download one of the many single-floppy Linux distributions (e.g., Tom's RootBoot ), and use it to bring up the machine as described. This is, of course, much faster than downloading and burning a rescue CD, especially on a slow connection. -- Ben ]

Follow these steps to reset the password using Knoppix:

  • Reboot the system and configure it to boot from the Knoppix CD (instructions available here)
  • At the Knoppix Boot Prompt (See Fig. 3 below) enter: knoppix lang=us to start boot Knoppix using the english locale. If you understand German, feel free to just hit 'Enter' to boot into Knoppix.
  • Once the system finishes booting, press + + (The Control, Alt and F1 key together) to switch to a virtual terminal.
  • Type mkdir mountplace to create a directory called 'mountplace'. This is where we will mount the filesystem.
  • Type mount /dev/hdaX mountplace, where /dev/hdaX is your root partition. More information on Linux partitions is available here.
  • Change to the "/etc" directory on your root partition by typing cd mountplace/etc.
  • Use your favorite text editor and open the 'shadow' file for editing. I use 'vi', so I type vi shadow (If you have a really old system, you won't have a shadow file, in which case you need to edit the 'passwd' file.)
  • Scroll down to the line containing the root user's information, which looks something like:
    root:dsfDSDF!s:12581:0:99999:7:::
  • Delete everything between the first and second colons, so that the line looks like:
    root::12581:0:99999:7:::
  • Save the file and exit your editor.
  • Type cd to return to your home directory.
  • Type umount mountplace to unmount the partition.
  • Type reboot to reboot your system, and remove the Knoppix CD from the drive.
  • Now you can log into your system as root with no password. Make sure you change the password immediately.
Knoppix boot screen
Fig. 3: Knoppix Boot Screen

2.1.2 Reseting passwords by mounting on another system and editing the password file

This option is a bit more work than any of the earlier options but is almost sure to work (except when the filesystem is encrypted).

Follow these steps to reset the password:

  • Shut down the machine after backing up all important data.
  • Open the casing, unplug the hard drive, and take it to another machine. (This system should be running Linux, since Windows can't read the Linux partition formats.)
  • Connect the hard disk as a slave drive and boot the new system.
  • Once the system finishes booting, mount the slave drive's root partition as shown above and edit the password file.

3.1 How to Prevent someone else from reseting your root password

If you are an even slightly security-consious sysadmin, the previous sections must have set off alarms while you were reading them. Is it really that easy to hack Linux? Yes and No. It all it comes down to the following: Physical Access is Root Access. Meaning, if you give someone physical access to a system, then you are giving them a very good chance of getting root access on your box. This is true for Windows, Linux, or any other OS out there.

But... you say that you need to give some people physical access to the server? There are some precautions you can take to slow down attackers and stop the noob's. In this section I will talk about various ways you can make your computer more secure against these types of attacks. So lets get started.

3.1.1 Password protecting GRUB and LILO

First, edit the /etc/inittab file and insert the following line, right after the "initdefault" line: ~~:S:wait:/sbin/sulogin. This will require a password to boot into single-user mode by making init run 'sulogin' before dropping the machine to a root shell. 'sulogin' requires the user to input the root password before continuing.

Unfortunately, the above step won't protect us against people who know what they are doing and pass init=/bin/bash to the kernel at the LILO prompt. To prevent unauthorized access I would suggest that you password protect LILO/GRUB by following these steps:

How to Protect LILO:

  • Open a shell prompt and log in as root
  • Open /etc/lilo.conf in your favorite text editor
  • Add the following line before the first image stanza: password= , where is your password.
  • Run /sbin/lilo -v to let the changes take effect
  • Type chmod 600 /etc/lilo.conf to give only root access to read and edit the file since all passwords are in plain text
  • Relax a bit, as your system is a little bit more secure

How to password-protect GRUB

  • Open a shell prompt and log in as root
  • Type /sbin/grub-md5-crypt and press enter
  • Enter the password you chose for GRUB when prompted. This will return an MD5 hash of your password
  • Open /boot/grub/grub.conf in your favorite text editor
  • Add password --md5 below the timeout in the main section (Replace with the hash you got in the previous step)
  • Save and exit
  • The next time you reboot, the GRUB menu will not let you access the editor or command interface without first pressing [p] followed by the GRUB password.

3.1.2 Password-protecting the BIOS

There are two primary reasons for password-protecting the BIOS of a computer:

  • Prevent Changes To BIOS Settings: if an intruder has access to the BIOS, they can set it to boot off of a diskette or CD-ROM.
  • Prevent Booting the System: Some BIOSes allow you to password protect the boot process itself. When activated, an attacker would be forced to enter a password for the BIOS to launch the boot loader.

Because the methods for setting a BIOS password vary between computer manufacturers, you should consult the manual for your computer. If you forget the BIOS password, it can often be reset either with jumpers on the motherboard or by disconnecting the CMOS battery. However, you should check the manual for your computer or motherboard before attempting this procedure.


By Suramya Tomar

Sudo Accessible Commands Report

The Linux sudo command allows a permitted user to execute a command as the superuser or another user, as specified in the /etc/sudoers file.

To find out what are the commands granted, just execute the sudo -l command, which essentially output all commands granted into a single long line.

If there are only few commands granted, that is fine to read out what are the commands granted, or find out any possible typo errors of the command name maintained in the /etc/sudoers file.

However, if there are few ten of commands granted, it is not that easy to read the sudo -l output, which list all the granted commands in a single line.

Well, there are two solutions to this irritating problem.

  1. Execute sudo -l | grep --color=auto tar command, which will highlight (in color) the matched keyword found in the single long line of commands granted.

  2. Download the wsudo.sh scripts file, which will breakdown individual commands output by sudo -l into multiple lines. Just type wsudo.sh to get a formatted version of sudo -l report, or pipe the output to grep or sort command. For example, wsudo.sh | grep tar or wsudo.sh | sort.

The first attempt is always simple enough. To make it more simple, create a simple shell scripts containing these lines below, and keep this scripts file in any directory path reported by $PATH environment variable.

#!/bin/sh

sudo -l | grep --color=auto $1


Assuming this scripts file saved as wsudo file name, then to find out whether the tar command is granted, just type wsudo tar at command prompt.


Source:bloggerdigest.

How To Reset Windows Vista Account Password using Trinity RSK

Copyright © reserved by Walker

Today, I found another trick and tested it successfully on my own Windows Vista UltimateThe Trinity Rescue Kit or TRK!
machine -
Trinity Rescue Kit is a tiny Linux distribution that used to repair or recover both Linux and Windows operating system, including the ability to reset a forgotten Windows Vista Administrator account password

In fact, there is a proven video demo of using Trinity Rescue Kit to reset a forgotten Windows Vista administrator account password. Beside Windows Vista editions, the TRK is said works well to reset account password in Windows 2000, Windows XP, and Windows 2003 too.

Cautions! It’s illegal (with most countries cyber laws, I think) to crack or reset another Windows logon account password that is not yours. The Trinity Rescue Kit is only a really good toolkit for those who want to reset a forgotten Administrator account password which is under his/her administration or ownership!

How to crack or reset a forgotten Windows Administrator account password with Trinity Rescue Kit in 3 minutes?

Download the latest Trinity Rescue Kit 3.2 Build 279 from the TRK official home page.

Make sure you’re downloading TRK ISO image file and validate its MD5 checksum with the published one (to confirm the ISO image is genuine and safe!)

Burn the TRK ISO image to a blank CD, which is less than 105MB in size.

Boot up Windows Vista machine with the Trinity Rescue Kit CD-ROM and wait for the tiny Linux loading completely to system memory.

Type winpass -u Administrator at the command prompt. To reset a Windows Vista Administrator account called Admin, just replace Administrator as Admin will do.

The winpass command will then displaying message that resemble these:

Searching and mounting all file system on local machine
Windows NT/2K/XP installation(s) found in:
1: /hda1/Windows
Make your choice or ‘q’ to quit [1]:

In this case, type 1 and press ENTER or just hit ENTER key to accept the default value, i.e. [1].

Next, it’s time to reset password of the specified Windows Vista account. The Trinity Rescue Kit suggests resetting it to a blank password that might work better than setting a new password! So, just type * (asterisk key) and hit the ENTER key to reset a blank or empty password for the specified Windows account.

Then, type Y and press ENTER key at the “Do you really wish to change it?” message prompt.

Now, type init 0 to shutdown the Trinity Rescue Kit Linux system, take out the CD-ROM and boot into Windows Vista Ultimate again.

This time, your Windows Vista should have automatically logged on with Administrator account without asking for a forgotten password!

Hack Windows Vista Logon Account Password

Copyright © reserved by Walker
Microsoft takes five years plus to develop Windows Vista, the so-called highly secured and renowned Windows operating system, with an overly redeveloped kernel.

But someone from China claimed that he takes only 3 minutes to hack or crack into Windows Vista logon account, or probably silently adding new Administrator account to Windows Vista without having to know the existing Administrator password.

Steps to crack Windows Vista logon account password (in case of forgotten Vista Administrator password)

  1. Reboot the Windows Vista and boot up with Windows Vista installation DVD.
  2. While the Windows Vista installation interface pops up, click the Repair You Computer
    link at the bottom-left corner.
  3. Next, the System Recovery Options dialog box appears. There are few options that related to repairing Windows Vista, looks like Recovery Console in Windows XP:

    Startup Repair options is used to automatically fix problems that are preventing Windows Vista from starting.

    System Restore to restore Windows Vista setting to an earlier point in time.

    Windows Complete PC Restore to restore Windows Vista from a full system backup.

    Windows Memory Diagnostic Tool could be the first Microsoft memory tester toolkit that bundled with Windows setup media.

    Command Prompt is the target option of this Vista hacking guide. Click on this option now.

  4. In the Vista Command Prompt, type mmc.exe and press ENTER key to bring up the Microsoft Management Console.
  5. Click on the File menu, select Add / Remove Snap-in option, locate and select the Local Users and Groups on the left panel, and click Add button to add it to the right panel.
  6. Now, the Choose Target Machine dialog box pop up. Keep the default setting by clicking the Finish button – that means using the Local Users and Groups snap-in to manage this local computer, and not another computer in network.
  7. Click OK button and return to MMC windows. Under the Root Console in left panel, double-click Local Users and Group that was added earlier. Click on User folder, locate and right-click the target Vista logon account that found in the right panel.
Guess you should know what to do now. Select the Set Password from the right-click menu to set a new password / reset old password


Thursday, July 17, 2008

How To Bypass Bios Passwords

Source: astahost.com
The BIOS;


Your computers BIOS is the first program that is run when your computer starts.

You can tell the BIOS to ask for a password when it starts, thus restricting access to your computer.
In most cases , It will Be Your Parents/Relative's.

Learn how to bypass it

Their Are 2 Ways Of Doing This. ;

1) Using a Backdoor BIOS Password

Some BIOS manufacturers implement a backdoor password. The backdoor password is a BIOS password that works, no matter what the user sets the BIOS password to. These passwords are typically used for testing and maintenance. Manufacturers typically change the backdoor BIOS passwords from time to time.

AMI Backdoor BIOS Passwords

Reported AMI backdoor BIOS passwords include A.M.I., AAAMMMIII, AMI?SW , AMI_SW, BIOS, CONDO, HEWITT RAND, LKWPETER, MI, and PASSWORD.

Award Backdoor BIOS Passwords

One reported Award backdoor BIOS password is eight spaces. Other reported Award backdoor BIOS passwords include 01322222, 589589, 589721, 595595, 598598 , ALFAROME, ALLY, ALLy, aLLY, aLLy, aPAf, award, AWARD PW, AWARD SW, AWARD?SW, AWARD_PW, AWARD_SW, AWKWARD, awkward, BIOSTAR, CONCAT, CONDO, Condo, condo, d8on, djonet, HLT, J256, J262, j262, j322, j332, J64, KDD, LKWPETER, Lkwpeter, PINT, pint, SER, SKY_FOX, SYXZ, syxz, TTPTHA, ZAAAADA, ZAAADA, ZBAAACA, and ZJAAADC.

Phoenix Backdoor BIOS Passwords

Reported Phoenix BIOS backdoor passwords include BIOS, CMOS, phoenix, and PHOENIX.

Backdoor BIOS Passwords from Other Manufacturers

Reported BIOS backdoor passwords for other manufacturers include:

VOBIS & IBM = merlin
Dell = Dell
Biostar = Biostar
Compaq = Compaq
Enox = xo11nE
Epox = central
Freetech = Posterie
IWill = iwill
Jetway = spooml
Packard Bell = bell9
QDI = QDI
Siemens = SKY_FOX
SOYO = SY_MB
TMC = BIGO
Toshiba = Toshiba

2) Resetting the BIOS Password using Software

Every system must store the BIOS password information somewhere. If you are able to access the machine after it has been booted successfully, you may be able to view the BIOS password. You must know the memory address where the BIOS password is stored, and the format in which the BIOS password is stored. Or, you must have a program that knows these things.

You can write your own program to read the BIOS password from the CMOS memory on a PC by writing the address of the byte of CMOS memory that you wish to read in port 0x370, and then reading the contents of port 0x371.

!BIOS will recover the BIOS password for most common BIOS versions, including IBM, American Megatrends Inc, Award and Phoenix.

CmosPwd will recover the BIOS password for the following BIOS versions:

* ACER/IBM BIOS
* AMI BIOS
* AMI WinBIOS 2.5
* Award 4.5x/4.6x/6.0
* Compaq (1992)
* Compaq (New version)
* IBM (PS/2, Activa, Thinkpad)
* Packard Bell
* Phoenix 1.00.09.AC0 (1994)
* Phoenix 4 release 6 (User)
* Gateway Solo - Phoenix 4.0 release 6
* Toshiba
* Zenith AMI

NTFS4DOS 1.8 (read/write NTFS from DOS)

NTFS4DOS Private is the only free for private usage tool that allows unrestricted full read and write access to NTFS volumes. Thereby it is the ideal solution for offline AV scanning, backups or it might be used as an ERD solution.

NTFS4DOS Private is loaded as a simple program like a CD-ROM extension and can coexist with any other tools like TCP/IP network, AV-Scanners or ghosting software.

As a bonus you get an NTFS checkdisk application for DOS as well as a defragmentation utility for any FAT/NTFS volume for DOS.

NTFS4DOS Private is from the same authors then the famous "CIA Commander 2" and "CIA DRiVE.net" recovery tool.


This is a freeware, Download it Here:

Graphics Card Interface

Source: tomshardware.com

This is the location of the graphics card interface, which nowadays can be AGP or PCI Express.

This is the part of the video card that plugs into your computer's motherboard. It is through this slot, or 'interface', that your graphics card and computer hand each other information. Since most motherboards only have a single type of graphics card slot, it is very important to buy a graphics card that matches the slot on your motherboard. For example, a PCI Express graphics card will not work in an AGP card slot. Not only will it not fit physically but the protocols for data transmission are different.

The most important aspect of a graphics card interface is the bandwidth. The term "bandwidth" refers to the amount of information that can pass through the interface in a given time.. The more bandwidth the interface offers, the faster a graphics card can perform - in theory. In practice, however, the interface is far less important than what the industry claims.

ISA

ISA stands for Industry Standard Architecture

Displayed here only for reference, this is the oldest PC card standard interface. Graphics cards with this interface became obsolete a long time ago. In fact, you won't even be able to buy a motherboard today with an ISA slot.

There are 8 bit and 16 bit ISA cards; only the latter uses both connector blocks (see image). EISA or Extended ISA cards were introduced for motherboards with higher bandwidths at 32 bits wide, and they offered bus mastering. However, they were expensive and were phased out when newer interfaces were commercialized.

PCI

The 32 bit classic PCI bus. Still today it is used for all sorts of expansion cards.

PCI stands for Peripheral Components Interconnect. It is a 32 bit wide bus that runs at 33 MHz, delivering a bandwidth of 133 MB/s. The PCI interface replaced ISA and its extensions (VL - Vesa Local Bus) in the 1990s, with the benefit of much higher bandwidth. PCI is the current standard for most computer add-in cards, but contemporary graphics cards no longer use PCI, as they have long since moved on to the AGP (and PCI Express) interface.

In many cases, however, computers from large manufacturers will come without an AGP or PCI Express port for future graphics expansion. In order to upgrade the graphics card on these machines, the only option is a video card with a PCI interface, but these are scarce, overpriced and have low performance.

AGP

(Accelerated Graphics Port)

AGP is a high-bandwidth interface designed specifically for graphics cards. It was based on the PCI rev. 2.1 specification. Unlike PCI, which is a shared bus, AGP is dedicated to one device. This allowed AGP to have numerous advantages over PCI such as directly read/write capabilities with the system memory, de-multiplexing or simplification in the organization and transfer of data, and increase clock speeds.

AGP has gone through three major revisions, with the newest being AGP 8x at 2,1 GB/s, meaning that it is eight times faster than the initial AGP standard at 266 MB/s (32 bit, 66 MHz). AGP is being replaced by the PCI Express interface on new motherboards, but AGP 8x (and even AGP 4x) still offer sufficient bandwidth for contemporary video cards. All AGP 8x cards will work in both AGP 4x and AGP 8x slots

PCI-X

PCI-X stands for 'Peripheral Component Interconnect - Extended', which can be taken literally: Its 64 bit wide interface delivers up to 4,266 MB/s, depending on the bus clock speed. PCI-X (not to be confused with PCI Express!) was first a speed upgrade to the PCI bus, but was upgraded with certain features that are required in the server space. It is not very common in ordinary PCs, and PCI-X graphics cards are very rare. You can use a PCI-X card in a regular PCI slot as long as it is a current revision (PCI 2.2 or higher), but you cannot add them to your motherboard with a PCI Express slot.

PCI Express

In contrast to ISA, PCI and AGP, PCI Express is a serial interface subsystem. Thanks to this, it runs with very few connections. Different from parallel buses, the total bandwidth is available for every device, while e.g. several PCI cards have to share the total available bandwidth.

PCI Express works on the basis of multiplying as many single links (or lanes) as required to lineup the desired bandwidth. PCI Express x1 slots are short and compact, and their connection offers 250 MB/s both ways (upstream to the system and downstream to the device). PCI Express x16 (16 links) offers a bandwidth of 4 GB/s up and down or 8 GB/s total. The inferior slot options (x8, x4, x1) are not used for graphics. A mechanical x16 slot does not necessarily have to run at 16 connected PCI Express lanes, though. There are many motherboards available that are capable of running two PCI Express x16 slots at x8 bandwidth each in order to support twin-graphics cards.

Although increased bandwidth is a welcome innovation, a more pressing need was facing the industry: power consumption. The AGP 3.0 standard (AGP 8x) could only deliver a maximum of 41.8 W (6 A from 3.3 V, 2 A from 5 V, 1 A from 12 V = 41.8 W and an additional 1.24 W could come from the 3.3 V auxiliary at 0.375 A). Video cards were introduced with dual 4 pin power sockets such as the ATI Radeon X850XT PE, which has one socket while the Nvidia GeForce 6800 Ultra has two.

By adding the four-pin connections, manufacturers extended the life of AGP cards as each supplied 6.5A or 110.5 W from these right angle connections (12 V + 5 V or 17 V x 6.5 A = 110.5 W). Overall, PCI Express is a much simpler solution as it can deliver 75 W through the x16 connector and an additional 75 W per six-pin connection for a total of 150 W. PCI Express solved the concern for future bandwidth and the power consumption need.

Buyers guide to graphics cards


Every PC comes with a graphics card (or adaptor) inside. Without one your computer would be unable to display anything on your monitor. Your system may have a dedicated card or, if it is of a lower specification, its graphics capability might be built-in to your motherboard. If you only use your computer for browsing the web, email and word processing, your current set-up will probably be fine. If, however, you want to use it for more visually demanding tasks such as video editing or playing 3D games, it may be worth considering an upgrade.

What does a graphics card do?
The role of a dedicated graphics card is to take processor-intensive tasks – such as moving polygons around the screen, calculating lighting, shading and rendering 3D objects – away from your PC’s main processor, leaving it free for other tasks. A graphics card works like a mini-computer within your PC, so the more memory it has and the more powerful its central processing chip, the faster it will be.

Do I need to upgrade?
If your computer is running slowly, buying a new graphics card won’t speed things up significantly – you’d be better off upgrading your memory as a starter, then maybe your motherboard or computer’s main processor. If on the other hand graphics performance is the one thing that is letting your system down, adding a new card will definitely improve matters. It will also let you play games at a much higher screen resolution. The type of graphics card you buy should match the specification of your computer (see ‘How much to spend?’).


ATI or nVidia?
Two companies make the GPU (Graphics Processing Unit) chips that nearly all of today’s graphics cards are built around. The processor range from ATI (www.ati.com) is known as Radeon, while nVidia’s (www.nvidia.com) is called GeForce. These chips are used on boards from a variety of manufacturers including Gainward, Sapphire, Asus and MSI. Choosing whether to go for an ATI card or an nVidia model is largely a matter of a personal choice.

Slot types
There are two types of motherboard expansion port designed expressly for graphics cards. If your computer is new, it could well have a PCI Express (Peripheral Component Interconnect Express) slot – the fastest, most modern option. These come in different sizes with the graphics cards fitting into the long x16 slot (the purple section in the picture above). If it doesn’t support PCI Express then it will most likely have AGP (Accelerated Graphics Port) instead. Older or very basic PCs may only have straightforward PCI slots (white in the picture above). It’s important to find out which type you have, as a card designed for one port won’t fit into another.

Before buying
You should check to see what space you have inside your computer’s case. Many new cards are bulky and may not fit inside your PC if space is restricted. Also, some high-end cards need connecting to your PC’s power supply. If you don’t have a spare Molex connector (large, white, square head) you’ll need to buy a Y cable splitter/extension cable (see picture, left).

Computer Processor Codenames

Source: Technibble

In the computer industry there are plenty of buzzwords that get slung about when talking about the next generation of computer hardware and CPU codenames are quite possibly the hardest to keep track of due to the sheer amount of them. We have put together this list with the codename of each of the existing AMD and Intel processors.

So what is the purpose of all the codenames? Well, it allows the chip companies to talk about their upcoming CPU’s without actually talking about them. The chip companies let slip the barebones facts about the chips, give it a codename and let the computer hardware geeks speculate and ask questions which makes for great material to write about in the hardware industry.

Why the weird names? It seems most of Intels processors codenames are inspired by local geography of the Pacific Northwest of America. Alaska, Deerfield, Foster, Gallatin, Northwood, Montana, Madison and McKinley are rivers in Alaska, California, Montana, Massachusetts and Vermont.

The early series of AMD processors (eg. K5, K6-2) had their name inspired by Kryptonite which is a fictional element from Superman comicbooks (Im assuming this was set up to sound like AMD is Intels kryptonite?). Some of the later AMD series were inspired by sports cars (eg. Corvette, Mustang). Now that is cleared up, on to the list.

AMD Codenames Processor
Description
Socket/Slot
X5 5×86-133 Socket 3
SSA5 K5 (original PR75-PR100) Socket 5, 7
5k86 K5 (newer PR120-PR200) Socket 7
K6 The Original AMD K6 core (cancelled) n/a
NX686 NexGen K6 Core which became the K6 Socket 7
Littlefoot 0.25µm K6 Socket 7
Chompers K6-2 Socket 7, Super 7
Sharptooth K6-3 Super 7
Argon Previously K7 n/a
K7 Athlon Slot A
K75 0.18µm Athlon Slot A
K76 0.18µm Athlon (with copper interconnects) Slot A
K8 Athlon 64
Thunderbird Athlon Slot A, Socket A
Mustang Athlon with a large L2 cache (cancelled) n/a
Corvette Previously mobile Athlon (now Palomino) n/a
Palomino 0.180.18µm Athlon XP/MP, Mobile Athlon 4 Socket A
Thoroughbred-A 0.13µm Athlon XP/MP 1700-2100+ Socket A
Thoroughbred-B 0.13µm Athlon XP/MP 1700-2400+, 2600-2800+, Semperon 2200-2800+ Socket A
Barton 0.13µm Athlon XP/MP 1700-2100+ Socket A
Thorton Athlon XP (256KB L2 cache) Socket A
Spitfire Duron Socket A
Camaro Previously Morgan
Morgan Mobile Duron & Mobile 7 Duron 900MHz - 1.3GHz Socket A
Applebread Duron 1.4 - 1.8GHz
Appaloosa 0.13µ Morgan Socket A
ClawHammer Athlon 64 (64bit) Socket 754 & Socket 939
ClawHammer DP Early name for the now Opteron DP Socket 940
Newcastle Althon 64 Socket 754 & Socket 939
Winchester 0.09µ Athlon 64 Socket 939
San Diego 0.09µ Athlon 64 and the Athlon 64 FX with SSE3 extensions Socket 939
Venice 0.09µ Athlon 64 with SSE3 extensions Socket 939
Odessa 0.09µ Mobile-version Athlon 64
Manchester Athlon 64 X2 with 512KB L2 cache and SSE3 extensions Socket 939
Toledo Athlon 64 X2 with 1024KB L2 cache and SSE3
extensions
Socket 939
SledgeHammer Opteron with a large L2 cache Socket 940
Palermo 0.09µ Sempron Socket 754
Paris Sempron Socket 754
Oakville Mobile Athlon 64 and Sempron Socket 754
Windsor Athlon 64 X2 and Athlon 64 FX-62 Socket M2
Orleans Athlon 64 Socket M2
Manila Sempron Socket M2
Intel
Codenames
Processor Description Socket/Slot
P23 486SX Socket 1, 2, 3
P23S 486SX SL-Enhanced Socket 1, 2, 3
P23N 487SX (coprocessor) Socket 1
P4 486DX Socket 1, 2, 3
P4S 486DX SL-Enhanced Socket 1, 2, 3
P24 486DX2 Socket 1, 2, 3
P24S 486DX2 SL-Enhanced Socket 1, 2, 3
P24D 486DX2 (with write-back cache) Socket 3
P24C 486DX4 Socket 3
P23T 486DXODP (486 Overdrive) Socket 3
P4T 486ODPR (486 Overdrive) Socket 1, 2, 3
P24T PODP5V (486 Overdrive) Socket 2, 3
P24CT Pentium Overdrive 3.3v Socket 2, 3
P5 Pentium 60/66MHz Socket 4
P5T Pentium Overdrive 120/133MHz Socket 4
P54C Pentium 75MHz - 120MHz Socket 5, 7
P54CQS Pentium 120MHz - 133MHz Socket 5,7
P54CS Pentium 120MHz - 200MHz Socket 7
P54CT(A) Pentium Overdrive Socket 5, 7
P55C Pentium MMX Socket 7
P54CTB Pentium Overdrive MMX Socket 5, 7
Tillamook Mobile Pentium MMX Mobile Module
P6 Pentium Pro Socket 8
P6T Pentium II Overdrive Socket 8
Klamath 0.35µm Pentium II Slot 1
Deschutes 0.25µm Pentium II Slot 1
Drake 0.25µm Pentium II Xeon Slot 2
Tonga Mobile Pentium II Mobile Module
Covington Celeron (Pentium II without cache) Slot 1
Mendocino 0.25µm Celeron with 128KB on-die L2 cache Slot 1, Socket 370
Dixon Mobile Pentium II with 256KB on-die L2 Mobile Module
Katmai 0.25µm Pentium III with SSE Slot 1
Tanner 0.25µm Pentium III Xeon with SSE Slot 2
Coppermine 0.18µm Pentium III with on-die L2 cache Slot 1, Socket 370
Tualatin 0.13µm Pentium III Socket 370
Coppermine-T 0.18µm Pentium III with Tualatin Voltage Socket 370
Cascades 0.18µm Pentium III Xeon Slot 2
Coppermine-128 0.18µm Celeron with 128KB L2 Socket 370
Timna Mobile Celeron with DRAM controller (cancelled) n/a
P68 Willamette n/a
Willamette 0.18µm Pentium 4 Socket 423, 478
Northwood 0.13µm Pentium 4 Socket 478
Prescott 0.09µm Pentium 4 with HyperThreading, Celeron D (Sockett 478), Celeron D (socket 775) Socket 775
Smithfield Pentium D, Pentium Extreme Edition Socket 775
Presler 0.065µm Pentium D
Conroe 0.065µm Pentium D (with reduced power consumption)
Banias 130nm Pentium M with 1MB L2 cache
Yonah Dual Core Pentium M and Single Core Celeron M
Merom 64bit version of the Yonah
Foster Xeon DP Socket 603
Foster MP Xeon MP Socket 603
Prestonia 0.13µm Xeon DP Socket 603
Gallatin 0.13µm Xeon MP Socket 603
Nocona 0.09µm Xeon (Socket 603) and Pentium 4 Extreme Edition (Socket 478 and Socket 775
Dothan 90nm Pentium M with 2MB L2 cache
P7 Previously Merced (Itanium)
Merced Itanium PAC 418
McKinley Itanium 2 with 3MB on-die L3 cache PAC 418
Madison 0.13µm Itanium 2
Deerfield Low cost Madison
Montecito 0.09µm Madison
Shavano Future Itanium family chip (Itanium 3?)
Dimona Future Itanium family chip (Itanium 3?)
Tukwila Future Itanium family chip (Itanium 3?)